
Digitize Embroidered Design opens the door to turning your artwork into precise, stitch-by-stitch instructions that a computerized needle can follow. Through a clear, beginner-friendly approach, this guide introduces embroidery digitizing basics and explains how the process translates art into sewable instructions. You’ll learn the essentials of machine embroidery digitizing, from choosing the right software to understanding stitch types, underlay, and density so your projects sew out cleanly. We also cover practical steps to convert embroidery design to DST and other machine formats, helping you follow a beginner embroidery digitizing guide with confidence. By the end, you’ll grasp the embroidery design digitization steps that turn sketches into repeatable, professional sew-outs.
Viewed from a broader perspective, this craft is about translating flat artwork into stitch data your machine can sew with reliability. In an LSI-friendly frame, the idea becomes a vector-to-stitch transformation that couples artistic intent with fabric behavior and thread mechanics. The focus is on building a repeatable workflow that adjusts density, underlay, and stitch direction to produce robust, professional results across fabrics.
Getting Started with Embroidery Digitizing: A Beginner’s Introduction
Embroidery digitizing is the process of turning artwork into stitch instructions that a machine can sew. For those just starting, it helps to frame this as a blend of art and technical steps found in the broader field of embroidery digitizing basics. A beginner-friendly approach emphasizes clear goals, patient practice, and a steady progression through foundational concepts such as stitch types, underlay, density, and pull compensation.
If you’re guided by a beginner embroidery digitizing guide, you’ll learn to think in terms of layers and stitch order rather than only colors. This perspective aligns with machine embroidery digitizing workflows, where you translate a flat design into a series of machine-friendly commands. Start with simple shapes, then expand to more complex artwork as confidence grows.
Core Concepts in Embroidery Digitizing Basics: From Images to Stitches
The core idea is that a flat image or sketch becomes a stitched file that a embroidery machine can interpret. Key elements include outlining, underlay, density, and stitch direction—each influencing how the final sew-out looks on fabric. Understanding these elements is essential to master embroidery digitizing basics and to produce designs that sew cleanly.
Essential terms such as running stitches, satin stitches, fill stitches, and underlay form the foundation of any project. Grasping how density and pull compensation affect fabric stability helps you progress from simple experiments to reliable machine embroidery digitizing that withstands wear and washing.
Choosing Tools to Elevate Your Machine Embroidery Digitizing
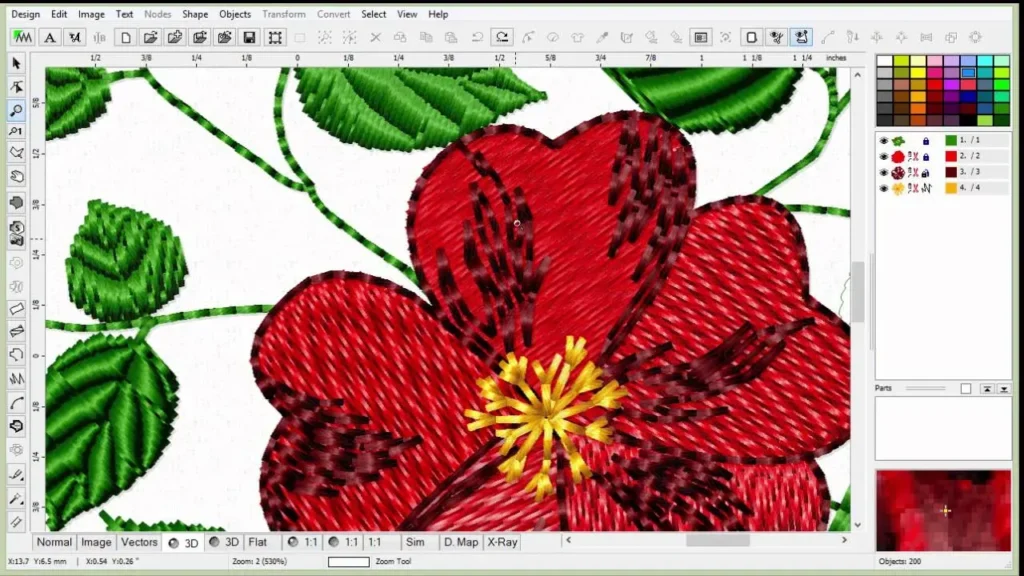
The tools you choose shape how quickly you learn and how precisely you control each stitch. Beginners often start with either paid professional software—like Wilcom’s Embroidery Studio or Hatch—or accessible options such as Ink/Stitch for Inkscape. The goal is to pick a platform that supports your learning pace while providing solid options for stitch types, density control, and underlay.
As you grow, explore specialty viewers and vector-to-stitch converters that help you preview sew-outs across fabrics. A practical path is to begin with a simple program aligned to the beginner embroidery digitizing guide you’re following, then gradually work up to tools that support more advanced features and cross-brand compatibility.
Digitize Embroidered Design: A Step-by-Step Practical Workflow
Prepare the artwork by choosing a high-contrast image, simplifying the design, and resizing it to fit your hoop. This sets the stage for a smooth workflow and aligns with embroidery design digitization steps that reduce complexity before you begin digitizing outlines and underlays.
Next, set up a new project, import the artwork into your tool, and begin digitizing from the outside in. Start with underlay stitches, then add outlines with satin or running stitches, build fills with balanced density, and gradually incorporate textures and details. This practical approach mirrors common workflows in the field and helps you Digitize Embroidered Design with a reliable sequence.
Optimizing Stitch Quality: Underlay, Density, and Path Planning
Underlay choice and density are pivotal for fabric stability and clean sew-outs. A well-chosen underlay can prevent puckering and improve coverage, especially on stretchy or delicate fabrics. Understanding stitch direction and how it affects fabric behavior contributes to improved embroidery digitizing basics in practice.
Path planning and stitch order optimization reduce jumps and redundant movements, saving machine time and reducing distortion. By monitoring overlaps and edge conditions, you can prevent gaps and heavy build-ups, while applying pull compensation helps minimize puckering on a variety of fabrics.
Exporting and Cross-Brand Compatibility: DST Conversions and File Prep
When you’re ready to sew, export your design in machine-ready formats such as DST, PES, EXP, or JEF. For projects that cross-brand compatibility, you may need to convert embroidery design to DST or another universal format. This step is a common part of machine embroidery digitizing and a practical example of how digitization outputs are used in real-world stitching.
Finally, perform a test sew on similar fabric and stabilizer to validate density, underlay, and stitch direction. If adjustments are needed, refine settings and re-sew. Keeping these steps in mind aligns with a broader embroidery design digitization steps framework and helps ensure your final design sews out consistently across machines.
Frequently Asked Questions
What does Digitize Embroidered Design mean, and how do embroidery digitizing basics help beginners?
Digitize Embroidered Design means turning artwork into stitch instructions that a machine can sew. In embroidery digitizing basics, you learn about stitch types (running, satin, fill), underlay, density and pull compensation, and how outlines and lettering are handled. Mastering these concepts helps beginners produce consistent sew-outs and sets the foundation for machine embroidery digitizing.
How does Digitize Embroidered Design work in practice, and what are the embroidery design digitization steps to take a project from concept to stitch?
Digitize Embroidered Design works by converting artwork into a stitch sequence the machine follows. The embroidery design digitization steps typically include: preparing the artwork, setting up a project with hoop size, digitizing outlines and underlays, adding fills and textures, adjusting density and pull compensation, checking stitch order, and exporting to a machine-ready format (DST, PES, EXP, JEF). Then perform a test sew to verify results.
What software and tools are recommended for Digitize Embroidered Design as a beginner, and how do they fit into a beginner embroidery digitizing guide?
For a beginner, consider options like paid software (Wilcom’s Embroidery Studio, Hatch by Wilcom, Brother PE-Design) and free/low-cost tools (Ink/Stitch). Start with a simple program to learn the basics, aligning with a beginner embroidery digitizing guide that emphasizes a gentle learning curve, foundational tools, and gradual skill growth.
How do I convert embroidery design to DST when Digitize Embroidered Design for cross-brand compatibility?
To convert embroidery design to DST, export or save your file in DST (or use a converter if needed). DST is a widely supported machine format, so ensuring compatibility often means converting to DST and re-testing on fabric to confirm stitch behavior.
What are the embroidery design digitization steps to turn a hand-drawn sketch into a machine-ready file when Digitize Embroidered Design?
Essential embroidery design digitization steps include: prepare the artwork, set up the project, digitize outlines and underlays, build fills, apply pull compensation, optimize stitch order, and export to DST or another machine format. Always perform a test sew on similar fabric to validate results.
What common mistakes occur with Digitize Embroidered Design and embroidery digitizing basics, and how can I fix them during projects?
Common mistakes include puckering, color bleeding, gaps, and warped embroidery. Fixes involve increasing underlay, adjusting density and stitch directions, using appropriate stabilizers, re-sequencing problem areas, and running test sews to verify adjustments before final production.
| Topic | Key Points |
|---|---|
| What is embroidery digitizing? | Converts artwork into stitch instructions; defines stitches, directions, density, and underlay for machine sewing. |
| Essential terms | Stitches (running, satin, fill); Underlay; Density & pull compensation; Lettering/outlines. |
| Prepare artwork | Use high-contrast image; simplify details; resize to hoop; reduce color count for beginners. |
| Set up a project | Create new project; choose hoop size; import and place artwork on stitch area. |
| Digitize outlines & underlays | Start with underlay; add edge outlines (satin or running); build fills with suitable density. |
| Add fills & details | Apply fills for larger areas; adjust density and stitch direction; use pull compensation; ensure legibility for text. |
| Check order & path | Optimize stitch sequence; minimize jumps; review overlaps and edge conditions to avoid gaps. |
| Convert to machine formats | Export to DST, PES, EXP, JEF; convert between brands if needed for compatibility. |
| Test sew & refine | Run a test stitch on similar fabric; adjust density/underlay/direction; iterate until satisfied. |
| Practical tips | Start small; practice with real fabric; use layers; limit color changes; save incremental versions. |
| Common mistakes & fixes | Puckering; color bleeding; gaps; warped embroidery. Fixes include extra stabilizer, better pathing, and tension adjustments. |
Summary
Digitize Embroidered Design is a craft that blends art, math, and software to translate artwork into stitch-ready instructions for embroidery machines. By understanding the basics, choosing the right tools, and following a structured workflow, you can Digitize Embroidered Design with confidence and produce professional machine embroidery results. Start with clear artwork, learn the step-by-step process, test on fabric, and refine your approach to improve stitch quality, color transitions, and overall efficiency. As you gain experience, your designs will sew out more consistently and your embroidery projects will look crisper and more polished.