
Custom Banner Design Checklist can transform how banners perform online and in print. A structured approach helps you map objectives to audience insights, guiding design choices with banner design tips in mind. This framework reinforces brand consistency by detailing banner design essentials like color, typography, imagery, and visual hierarchy. By following printable banner guidelines and exporting assets in the right formats, you streamline production and protect quality across channels. Ultimately, a thoughtful checklist saves time, boosts conversions, and keeps messaging aligned with your brand.
From a broader lens, this banner creation checklist functions as a practical guide for marketers and designers aiming for consistent visuals. Think of it as a set of graphic banner guidelines that ties together asset choices, messaging, and calls to action across web and print contexts. Framing the process with current best practices creates a scalable workflow that adapts to different sizes, audiences, and devices. A thoughtful process also supports accessibility and inclusive design across channels. This approach scales from banner ads to large-format displays, ensuring consistency everywhere. By documenting decisions, teams reduce miscommunication and speed up approvals. In practice, you can repurpose layouts and assets across campaigns without starting from scratch. Therefore, the banner design workflow becomes a repeatable blueprint for faster, more reliable launches. Keep this living document updated to reflect evolving branding.
1) Aligning Objectives and Audience for Banner Design Success
Great banners begin with a clear objective and a deep understanding of the target audience. By identifying what you want the banner to achieve—whether it’s driving clicks, capturing sign-ups, or promoting a time-sensitive offer—you can tailor headlines, visuals, and CTAs to meet real user intent. This aligns with the idea of a banner design checklist, which keeps the message on-brand and purpose-driven across channels. Incorporating LSI-friendly terms like banner design tips and printable banner guidelines helps search engines connect the content to practical, actionable guidance for readers.
When objective and audience are defined, content hierarchy becomes a practical tool. You’ll structure copy and imagery so the most important information appears first, followed by supporting details and a strong call to action. This approach mirrors core banner design essentials—consistent typography, color choices with sufficient contrast, and a CTA that aligns with user expectations. By prioritizing relevance and engagement, you reduce cognitive load and increase the likelihood of click-through and conversions.
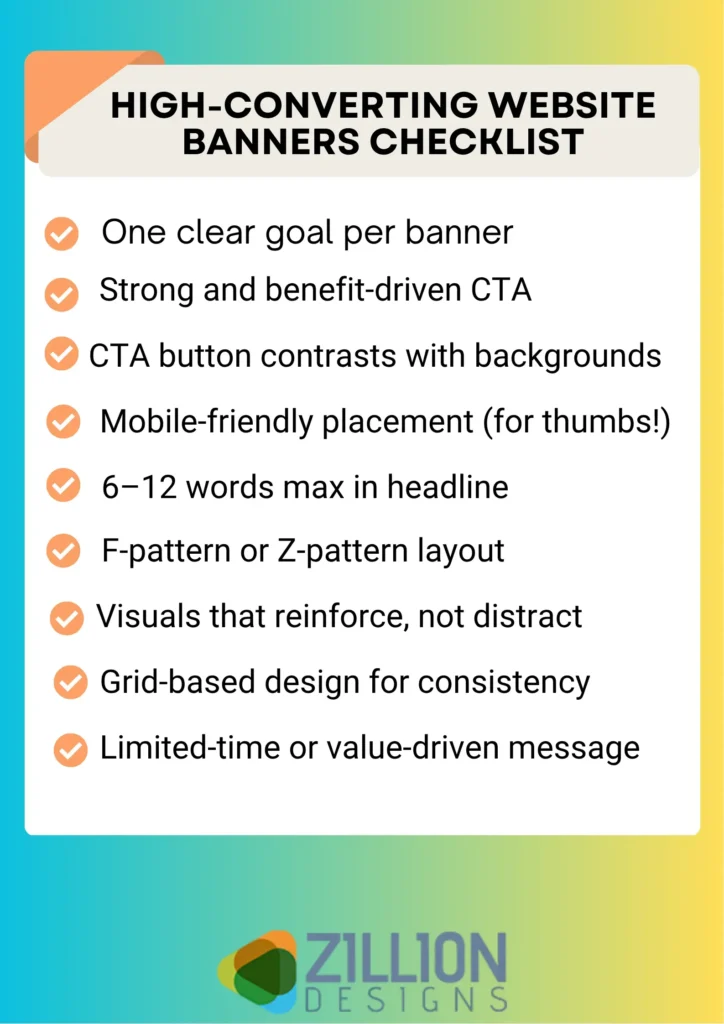
2) Custom Banner Design Checklist: Your Roadmap to Cohesive Brand Messaging
Adopting a Custom Banner Design Checklist provides a repeatable framework for ensuring consistency and efficiency. This roadmap helps teams translate brand voice into visual form, from tone and typography to imagery and spacing. By tying the checklist to banner design tips and practical printable banner guidelines, you create a scalable process that preserves brand integrity while adapting to different placements and formats.
Use the checklist to validate every element before launch: objective, audience alignment, value proposition, imagery, color palette, and accessibility. This disciplined approach reduces back-and-forth revisions and makes it easier to compare performance across campaigns. Linking to banner design essentials reinforces best practices, while printable banner guidelines ensure that your designs translate well from screen to print, maintaining legibility and impact across media.
3) Crafting a Compelling Value Proposition with Descriptive Headlines
The headline is the gateway to engagement. A concise, benefit-focused statement should communicate the viewer’s gain at a glance, supported by a subheadline that offers just enough detail to entice further action. This practice aligns with banner design tips that emphasize clarity, immediacy, and brand voice. When you couple a strong value proposition with visually aligned imagery, you increase the odds of capturing attention in seconds rather than minutes.
A well-crafted value proposition scales across devices and formats. By testing variations of headlines and supporting copy, you can optimize for readability and emotional resonance. The banner design essentials framework supports this by advocating legible typography, a clean layout, and a CTA that naturally follows the headline, ensuring the message remains coherent whether viewed on mobile, desktop, or print.
4) Visual Identity: Color, Typography, and Accessibility in Banners
Color and typography speak before words are read. Selecting a brand-consistent color palette with sufficient contrast and pairing headings with legible body type ensures readability across screens and print sizes. This visual language is a cornerstone of banner design essentials, helping to reinforce recognition and trust. Thoughtful color accents can highlight the CTA and guide the viewer’s eye toward conversion without overwhelming the message.
Accessibility broadens reach and improves user experience. Ensuring adequate color contrast, providing descriptive alt text for images, and maintaining keyboard navigability are essential practices. Inclusive design elevates banner performance by making content perceivable and operable for a wider audience, while still preserving the aesthetic and brand voice. These considerations align with printable banner guidelines and the broader banner design checklist to deliver accessible, high-impact banners.
5) From Print to Digital: Ensuring Print-ready and Digital-ready Banner Guidelines
Banners live in multiple contexts, so you must design for both print-ready and digital-ready outcomes. This means higher resolution (often 300 DPI for print), proper bleed, and safe zones to prevent critical content from being cut off. Digital versions require web-friendly file sizes and scalable vector elements where possible. By applying printable banner guidelines and clear export practices, you can maintain quality and consistency across formats.
A seamless handoff between print and web starts with standardized file formats and organized layers. Export assets in PNG or JPG for images and PDFs for print with bleed, while labeling layers to facilitate revisions. Integrating banner design checklist principles with digital optimization helps ensure a cohesive experience—from a billboard to a banner ad—without sacrificing clarity or impact.
Frequently Asked Questions
What is the Custom Banner Design Checklist and why should I use it for banner design?
The Custom Banner Design Checklist is a structured guide that helps you plan every banner element before you design. It ensures your objective and audience shape your headline, visuals, and CTA, leading to clearer messaging and higher conversion. Used alongside banner design checklist and banner design tips, it promotes consistency across channels and aligns with printable banner guidelines when printing is required.
How can I apply the Custom Banner Design Checklist to create effective digital banners?
Begin with a clear objective and audience, then apply banner design tips to craft a strong value proposition, hierarchy, and CTA. The checklist guides typography, color, imagery, and responsive layouts to perform well on desktop, mobile, and email headers, while keeping accessibility in mind. This approach pairs with the banner design checklist for consistency and with printable banner guidelines when needed.
What are the core elements of banner design essentials included in the checklist?
Core elements include a brand-consistent color palette, legible typography, readable contrast, high-quality imagery, and a clear CTA. The banner design essentials emphasize hierarchy, alignment, and visual rhythm to improve readability and engagement, while aligning with banner design tips and printable banner guidelines.
What print-ready specifications should I follow according to the printable banner guidelines?
For print, use high resolution (300 DPI+), proper bleed, safe margins, and export assets in print-friendly formats (PDF with bleed and labeled layers). For digital banners, ensure 72 PPI and optimized file sizes. The printable banner guidelines help guarantee print quality while the checklist keeps branding and file structure consistent.
How do I test and optimize banners using the Custom Banner Design Checklist?
Use structured proofing, stakeholder approvals, and optional A/B tests to compare headlines, imagery, and CTAs. Check accessibility and color contrast, verify alt text or descriptive labels where applicable, and iterate based on feedback. This aligns with banner design tips and the broader checklist to boost performance over time.
| Key Point | Focus / Purpose | Practical Takeaways |
|---|---|---|
| 1) Clear objective and target audience | Define objective; understand audience context | State the goal (e.g., clicks, sign-ups, offers); tailor copy, visuals, and CTA to audience; align with user intent; plan content hierarchy and color psychology |
| 2) Compelling headline or value proposition | High-impact, audience-relevant headline | Use a single benefit-focused statement high in the layout; add a supporting subheadline; ensure brand-consistent voice; pair with imagery to improve CTR |
| 3) Brand-consistent color palette and typography | Brand alignment and readability | Choose high-contrast colors; pair bold display fonts with clean body typography; maintain consistent visual identity |
| 4) Readable typography and contrast | Accessibility and legibility across sizes | Test contrast ratios; adjust font size, line height, and tracking; ensure legibility on mobile and print sizes |
| 5) High-quality imagery or illustration | Visuals support the message and audience | Use high-resolution photos or vector art; avoid cliché stock; ensure lighting, composition, and relevance to value proposition |
| 6) Clear CTA and conversion-focused layout | Action-oriented, prominent placement | Contrast CTA button, generous padding, concise text; place along the natural reading path; ensure accessibility on all devices |
| 7) Visual hierarchy and alignment | Clear information order and consistent grid | Use a grid, balanced whitespace, align with brand grid; position headline, value, details, and CTA for quick scanning |
| 8) Print-ready and digital-ready specs | Technical production requirements | Print: 300 DPI, bleed, safe zones; Digital: 72 PPI, optimized file sizes; export PNG/JPG for images, PDF for print with bleed; label layers |
| 9) Accessibility and inclusive design | Inclusive, usable by all viewers | Ensure color contrast, alt text, keyboard navigation, meaningful link text; avoid color-only messaging; widen audience reach |
| 10) Responsive or scalable design for different sizes | Design adapts to multiple sizes and contexts | Create vector elements; use responsive typography; craft desktop/tablet/mobile layouts; keep CTA prominent |
| 11) Proofing and testing process | Structured review and validation | Conduct peer reviews, client approvals, A/B tests where possible; request physical proofs for print; iterate to reduce revisions |
| 12) Legal and ethical compliance | Licensing, trademarks, and truthful claims | Verify licenses and permissions; align with brand guidelines and laws; consult legal counsel if unsure |