
In embroidery design, imagination and craft meet to turn simple ideas into stitched realities. From sketch to stitch, you map mood boards, color swatches, and a clear concept that will guide your project. Inspiration can emerge from decorative embroidery design ideas that spark creativity for beginners and seasoned stitchers alike. This brief introduction keeps language approachable while outlining practical steps that translate concept into cloth. By the end, you’ll understand how to design embroidery from concept to cloth with confidence and a hands-on mindset.
Using Latent Semantic Indexing as a guide, we reframe the topic with terms like needlework design journey and thread-based composition. The embroidery design process can be seen as a cohesive workflow, from idea to stitch planning and transfer. For learners, a hand embroidery design tutorial offers practical steps, while references to sketch to stitch anchor early exploration. This approach preserves meaning while appealing to search engines by aligning related terms with user intent.
From Concept to Sketch: Setting a Clear Vision
A strong embroidery design starts with a concept that can be captured in a rough sketch or mood board. This early step aligns with the embroidery design process and helps you decide on composition, scale, and intent. By clarifying the story you want to tell, you ensure the final piece reads clearly from concept through stitch.
Use quick thumbnails to test balance and flow before committing to a final drawing. Even when you plan a hand-stitched piece, sketching keeps you ahead of stitch counts, thread choices, and fabric behavior. This is also the moment to consider how to design embroidery in a way that remains flexible enough to adapt to your chosen fabric and hoop while guiding your next steps in the project.
The Embroidery Design Process: Planning for Precision
With the concept in place, enter the embroidery design process as a structured plan. Decide which materials, stitches, and sizes will bring the vision to life, and map out placement on the garment or textile. Defining these choices early helps maintain a cohesive look and reduces late-stage changes.
Create a simple template or pattern by printing or tracing the sketch, then scale it to the embroidery area. If you work by hand, transfer lines lightly onto the fabric; if machine-based, align the digital file with fabric count and hoop size. The goal is a faithful guide for stitching rather than a perfect replica at the planning stage.
Sketch to Stitch: Translating Ideas into Pattern and Transfer
Translating your pencil sketch into stitchable form is the essence of sketch to stitch. Choose a transfer method that fits your fabric and project scale: direct tracing with water-soluble markers for small pieces, lightbox-pattern tracing for larger motifs, or stabilized templates for machine embroidery.
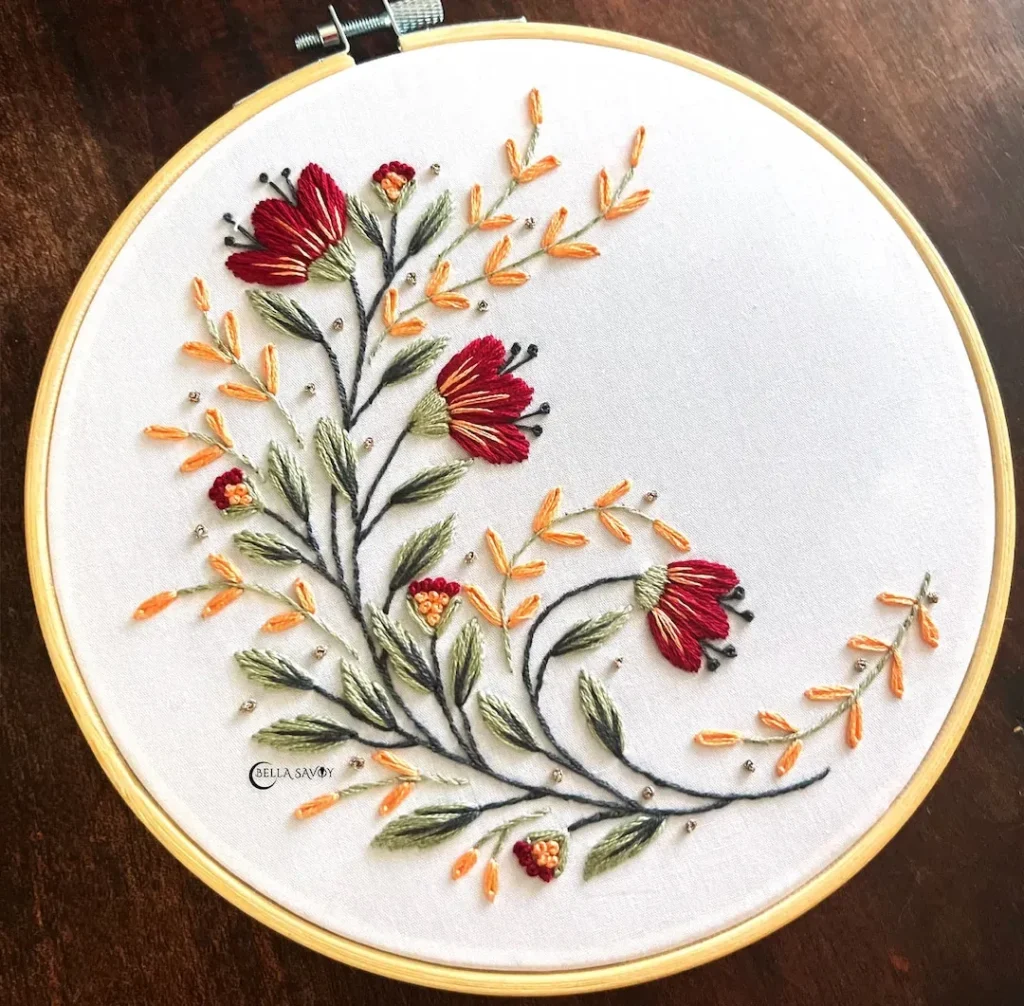
Selecting stitches is where the design gains character: outline/backstitch for crisp edges, satin stitch for solid fills, long-and-short for shading, and decorative knots or seed stitches for texture. Align stitch choices with the fabric’s behavior, and keep a log of color plans to support future tweaks.
How to Design Embroidery: Tools, Color, and Texture
Tools and materials shape what’s possible. A smooth cotton or linen base works well for clean embroidery design, while thread selection—cotton floss for matte finishes or silk/metals for glow—drives mood. When you explore how to design embroidery, consider how fibers interact with fabric tension and stabilizers to prevent puckering.
Color and texture are your storytellers. Build a palette with light-to-dark shading and test combinations on fabric swatches before committing. Experiment with stitches that provide texture—the satin stitch, French knots, seed stitches—so the piece gains depth, which ties into decorative embroidery design ideas.
Decorative Embroidery Design Ideas: Motifs, Balance, and Rhythm
Inspiration fuels decoration. Look to nature, architecture, and textile patterns to generate decorative embroidery design ideas, then translate those motifs into your own voice. Start with a central motif and support it with secondary elements that echo the theme while leaving negative space for rhythm.
Play with scale, repetition, and symmetry to guide the viewer’s eye. Consider framing motifs along a boundary or scattering them to convey movement. By balancing line work with filled areas, you can craft a decorative embroidery design that feels intentional rather than busy.
Hand Embroidery Design Tutorial: Techniques, Practice, and Finishing
For beginners, a hand embroidery design tutorial provides a structured path: learn tension control, needle direction, and stitch density, then apply these skills to your sketch and fabric. Practice simple motifs on scrap fabric to build confidence before advancing to your main piece. A thoughtful tutorial should connect stitches to your specific design, not just list techniques.
Final steps bring your concept to life. Secure threads, wash or stabilize as needed, and press carefully. Reflect on the embroidery design as a whole—does color balance and texture convey the intended mood? Finishing touches and presentation—framing, mounting, or gifting—turn a practiced concept into a shareable work of art.
Frequently Asked Questions
What is the embroidery design process from concept to finished stitch?
The embroidery design process turns a concept into a stitched piece by moving through planning, sketching, pattern transfer, stitch selection, color planning, testing on fabric, and final finishing. Start with a clear idea, sketch multiple layouts, create a simple transfer pattern, choose stitches and colors, test on scrap fabric, then stitch and press for a polished result.
How does the sketch to stitch approach help beginners plan an embroidery design?
Sketch to stitch helps translate ideas into a practical stitching plan. Use quick thumbnails or mood boards to test balance, scale, and composition before transferring a pattern to fabric, then map out stitches, colors, and order to guide your actual stitching.
What should you consider when learning how to design embroidery?
When learning how to design embroidery, consider fabric choice, thread type and color, stabilizers, hooping tension, and a clear plan for texture and shading. The process blends practical constraints with creative decisions to guide you from mood to finished design.
What are decorative embroidery design ideas to spark creativity?
Decorative embroidery design ideas often draw on nature, architecture, and everyday textures. Explore scale, repetition, and texture—using stitches like satin, long-and-short shading, and French knots to build visual interest while balancing negative space.
Why would a hand embroidery design tutorial be helpful for learners?
A hand embroidery design tutorial teaches fundamental stitches, tension control, and fabric handling, helping you apply a sketch to stitch plan with confidence. It reinforces core techniques and shows how to adapt a concept to your chosen fabric and hoop for cohesive results.
Which transfer methods and stitch combinations best translate a sketch to stitch?
Use direct tracing on fabric, printable patterns, or stabilized templates to transfer the design. Then combine stitches such as backstitch, satin stitch, long-and-short shading, and texture stitches to faithfully realize your sketch to stitch.
| Aspect | Summary | Practical Tip |
|---|---|---|
| Clear Vision (From Sketch to Stitch) | Begin with a rough sketch, mood board, or color swatches to capture composition, scale, and intention. | Use quick thumbnails to test balance; keep the concept flexible to fit fabric and thread. |
| Translation into Embroidery Design Process | After the sketch, plan materials, stitches, size, and placement to maintain a cohesive look. | Create a simple template or pattern and test scale on tracing or fabric. |
| Materials, Tools, and Design Mindset | Fabric choice (cotton/linen) provides a clean canvas; thread options (cotton floss, silk, metallic) influence finish; consider stabilizers. | Prepare a practical materials checklist to guide purchases and setup. |
| Color, Texture, and Balance | Color palettes set mood; texture via stitches adds depth; test color combos on fabric swatches. | Record stitch choices and color mixes for future reference. |
| Transfers, Patterns, and Stitch Choices | Use transfer methods appropriate to fabric and size; choose stitches to express texture (outline/backstitch, satin, long-and-short, French knots). | Select a stitch plan that supports the design’s form and shading needs. |
| Hand Embroidery Design Tutorial Mindset | Newcomers benefit from tutorials that cover fundamentals: tension, needle direction, stitch density; experienced stitchers benefit from revisiting basics. | Apply lessons to your sketch and fabric to keep results cohesive. |
| Practical Workflow: Step-by-Step | Move from concept to sketch, refine pattern, transfer, plan stitches and colors, test swatches, then stitch and finish. | Follow the steps in stages and use tests to gauge tension and harmony before final stitching. |
| Common Pitfalls and How to Avoid | Warp/puckering, uneven stitches, color bleed, and fading edges can occur without planning. | Use stabilizers, maintain consistent tension, test colors, and finish edges neatly to keep designs crisp. |
| Inspiration and Final Piece | Seek ideas from nature, architecture, textures, and motifs to expand decorative embroidery design ideas. | Keep an inspiration folder and sketch adaptations to fit your own voice while honoring fundamentals. |
Summary
Embroidery design is a journey that blends imagination with skilled handwork, turning a concept into a tangible textile piece. By starting with a clear vision, translating ideas into a practical plan, selecting appropriate materials and threads, and layering color, texture, and stitch techniques, you craft pieces that are both decorative and expressive. This approach emphasizes mindful planning, steady practice, and thoughtful finishing to bring a cohesive embroidery design to life in home decor, fashion, or art.