
Embroidered Design blends art and patience, turning simple stitches into wearable, decorative pieces. This introductory overview invites curious crafters to explore the practice with a clear path from idea to finished piece. You’ll discover how the right setup, mindset, and practice translate into confident, even stitching. The foundations covered here focus on simple tools, essential techniques, and practical tips that prevent common struggles. From a tiny monogram to a larger motif, this approach starts with core basics and grows toward personal style.
From a Latent Semantic Indexing perspective, beginner embroidery is a form of needlework that emphasizes texture, color, and personal expression. Think of it as textile embellishment and hand-stitched artistry that borrows terms like stitch work and surface decoration to describe similar ideas. Approaching the topic with accessible language helps beginners see how small steps—gentle curves, even tension, and thoughtful planning—lead to meaningful results. With this in mind, beginners can build confidence through simple projects that gradually introduce new stitches and patterns. In short, the journey remains approachable and adaptable, inviting experimentation and personal storytelling through thread. The emphasis on careful planning, patient repetition, and consistent practice helps you track progress and celebrate small wins along the way. Keep a dedicated sketchbook or practice sheet to capture ideas and track improvement over time.
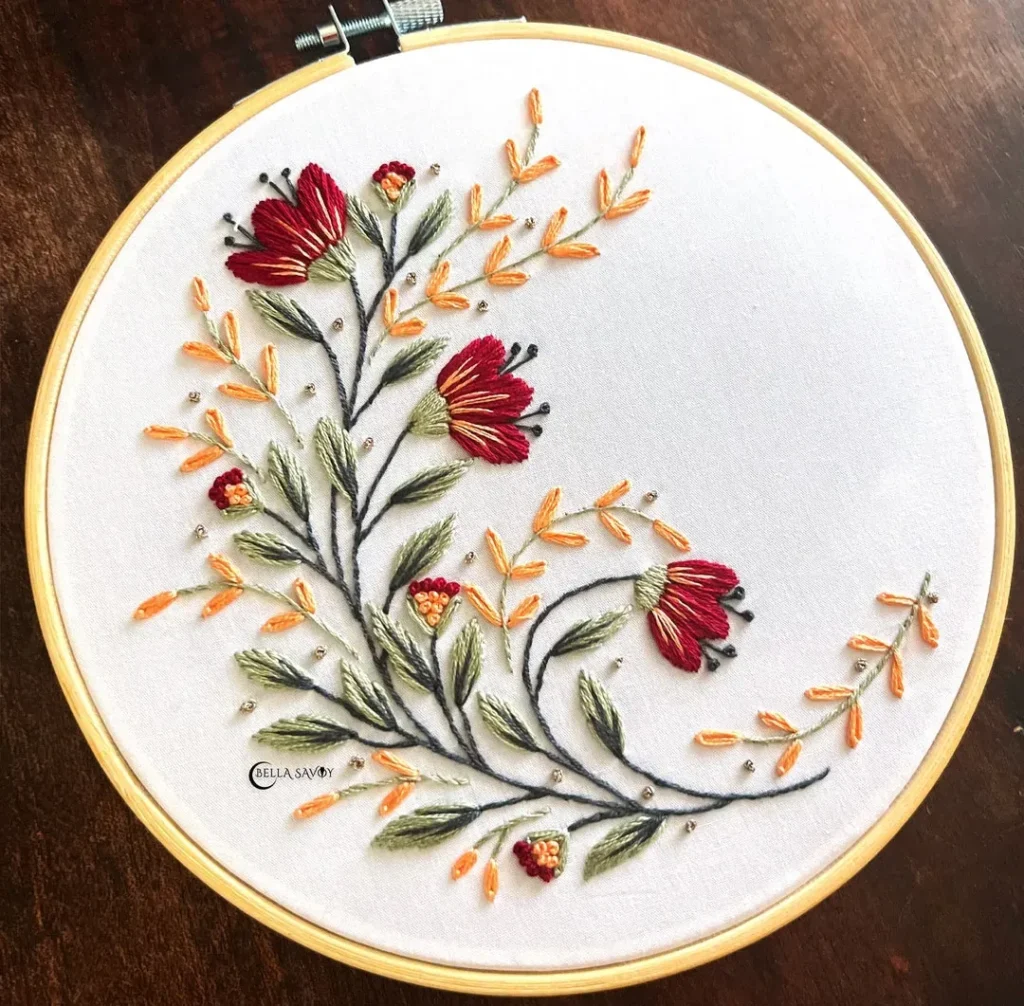
Embroidered Design Essentials for Beginners: Tools, Techniques, and Fabric Prep
Embroidered Design is the thread between art and patience, and beginning successfully starts with clear goals for beginner embroidery. A well-organized workspace and a focus on the basics set the tone for confident practice. This introduction also highlights fabric prep for embroidery, because a clean, prepared surface helps stitches sit evenly and keeps your project moving smoothly.
Choosing a few reliable colors and a small motif lets you practice without overwhelm. As you learn, you’ll connect Embroidered Design concepts to practical steps, and you’ll start to recognize how different threads, weaves, and tools influence your outcome. This is where embroidery techniques and a patient approach begin to pay off in real progress and enjoyment.
Essential Embroidery Tools for Beginners: Hoops, Needles, and Threads
Investing in the right embroidery tools for beginners makes practice feel smoother and more enjoyable. A small hoop or frame, a sharp embroidery needle, and a starter set of stranded cotton floss form a practical foundation for your projects, while a few stabilizers can save you from puckering. Think of this as your toolkit for beginner embroidery success.
Pair your tools with a simple fabric choice and an easy marking method, and you’ll notice how fabric prep for embroidery begins to pay off in stitch control. When you build consistency with your tools, tension, and handling, you lay the groundwork for more complex patterns and longer sessions without fatigue.
Mastering Basic Embroidery Stitches for Confident Projects
Mastering basic embroidery stitches gives you the vocabulary to translate ideas into stitched art. Start with backstitch, running stitch, and satin stitch, then add split stitch and French knots as you gain confidence. Practicing these stitches on a small swatch helps you develop rhythm, even tension, and precision in line work.
Beyond the mechanics, embrace embroidery techniques that suit your motif. Focus on spacing, consistency, and alignment to build clean outlines and filled shapes. As your comfort grows, you’ll be able to mix stitches in cohesive ways and start translating sketches into ready-to-stitch designs with quality results.
Fabric Choices and Fabric Prep for Embroidery
Fabric choice sets the stage for smooth stitching. For beginners, even-weave cotton or linen provides predictable tension, making your early projects look neater. Understanding fabric prep for embroidery—pre-washing, ironing, and selecting a light fabric color to see stitches clearly—helps your work stay consistent from start to finish.
Stabilizers can be your quiet allies, especially when handling delicate fabrics or tight satin fills. Learning when to use tear-away or cut-away stabilizers and how to hoop without distortion reduces puckering and improves stitch alignment. With good fabric prep practices, you’ll approach each project with confidence rather than guesswork.
Transferring and Planning Your Design: Embroidered Design in Practice
Transferring your design accurately is a practical skill that saves time and preserves your intended look in Embroidered Design projects. Try tracing from a printed pattern with a water-soluble pen, or use light graphite transfer on light fabrics to guide your stitches without dark lines showing through. Clear lines keep your stitches neat and predictable.
Color planning is a powerful part of the process. Start with a small palette of three to five colors and map where each shade will live in your motif. Thinking in terms of color harmony—analogous, complementary, or triadic—helps you apply embroidery techniques more consistently and produces designs that feel intentional.
Starting Small: Simple Starter Projects to Build Your Embroidery Techniques
Starting small is the surest way to build confidence in beginner embroidery. Choose a simple motif—like a leaf or heart—and apply one or two stitches at a time to learn tension and control. These tiny projects train your eye for fabric, thread, and weave as a unified system for the craft.
Each starter piece becomes a learning moment about layout, color balance, and stitching rhythm. As you finish more projects, your process speeds up and your embroidery techniques become more fluid, turning curiosity into steadily improving results and a growing sense of pride in your work.
Frequently Asked Questions
How can I start Embroidered Design as a beginner using beginner embroidery concepts?
Begin with the basics: set up a small practice hoop, choose a simple motif, and learn 1–2 stitches. For Embroidered Design, focus on consistent tension and smooth passes on a swatch before tackling larger pieces, using beginner embroidery ideas to build confidence.
What are essential embroidery tools for beginners when working with Embroidered Design?
Key items include a stable hoop or frame, a sharp embroidery needle, stranded cotton floss (plus a few colors), smooth fabric, and marking tools. Using the right embroidery tools for beginners helps you keep fabric taut and achieve clean lines in Embroidered Design.
Which basic embroidery stitches are most useful for Embroidered Design novices?
Start with backstitch for outlines, running stitch for texture, and satin stitch for fills. These basic embroidery stitches cover common Embroidered Design patterns and help you build control and even rhythm.
What embroidery techniques should I learn first for Embroidered Design?
Focus on clean outlines, simple shading, and even satin fills. These embroidery techniques form the foundation for translating simple ideas into successful Embroidered Design projects.
How should I handle fabric prep for embroidery in Embroidered Design projects?
Choose smooth, even-weave fabrics like cotton or linen. Use stabilizers for delicate fabrics, and transfer designs with temporary marks. Proper fabric prep for embroidery helps Embroidered Design stitches stay neat and balanced.
How can I build a practical practice plan for Embroidered Design using beginner embroidery concepts?
Set small, regular goals (e.g., 15–20 minutes, three times a week), practice on a swatch with a couple stitches, then gradually add motifs. This routine supports steady progress in Embroidered Design and reinforces essential beginner embroidery skills.
| Section | Key Points |
|---|---|
| Tools and Materials |
|
| Techniques and Stitches |
|
| Fabric, Stabilizers, and Preparation |
|
| Color, Thread Selection, and Planning |
|
| Practical Starter Project Ideas |
|
| Troubleshooting and Common Pitfalls |
|
| Developing a Routine and Long-Term Practice Plan |
|
| Incorporating Embroidered Design into Daily Life |
|
| Conclusion: your path to confident Embroidered Design |
|
Summary
Embroidered Design invites beginners into a patient, tactile world where simple stitches evolve into personal, wearable art. This overview highlights essential tools, core techniques, and practical practice steps to help you start with confidence. By focusing on a small set of dependable stitches, selecting suitable fabric and thread, and trying simple starter projects, you can develop steady technique and a distinctive style. With consistent practice and mindful preparation, Embroidered Design becomes a rewarding, soothing creative habit.