
Embroidered Design for Beginners is your entry point to a timeless craft that blends pattern, texture, and personal expression. This friendly introduction will walk you through embroidery basics, from selecting materials to mastering a few reliable stitches. As you explore a beginners embroidery guide, you’ll learn essential steps like fabric prep for embroidery and how to manage hoop setup and stabilizers to keep stitches neat. The goal is to build confidence with basic embroidery stitches and thoughtful color choices while keeping the process approachable. Whether you’re decorating a tote, a jacket panel, or a small wall hoop, this guide shows you how simple steps can become a finished, personal piece.
For newcomers, this is a starter-friendly look at needlework that eases you from simple outlines to a cohesive design you’ll be proud to display. Think of it as a foundation course in fabric prep, transfer methods, and the core embroidery stitches that yield reliable results. By framing each session as a small motif and choosing a limited palette, you’ll build confidence in stitch density, tension, and color balance. As your skills broaden, the same principles apply to larger projects, expanding your toolkit with varied textures, finishes, and surface placements.
Embroidered Design for Beginners: Getting Started with Fabric Prep and Tools
Embroidery is a timeless craft that blends pattern, texture, and personal expression. If you’re new to needle and thread, start with Embroidered Design for Beginners to move from concept to a finished piece. This approach mirrors embroidery basics and follows a practical, beginner-friendly path from fabric prep for embroidery to choosing your first color palette.
Tools and setup are the quiet heroes of your first projects. Begin with a cotton or linen fabric, a small embroidery hoop, a sharp embroidery needle, scissors, and a simple palette of 3–6 colors. Following a beginners embroidery guide helps keep the project manageable, and paying attention to hoop setup and stabilizers will keep stitches neat, especially on knit or loosely woven fabrics.
Mastering Basic Embroidery Stitches for Beginners
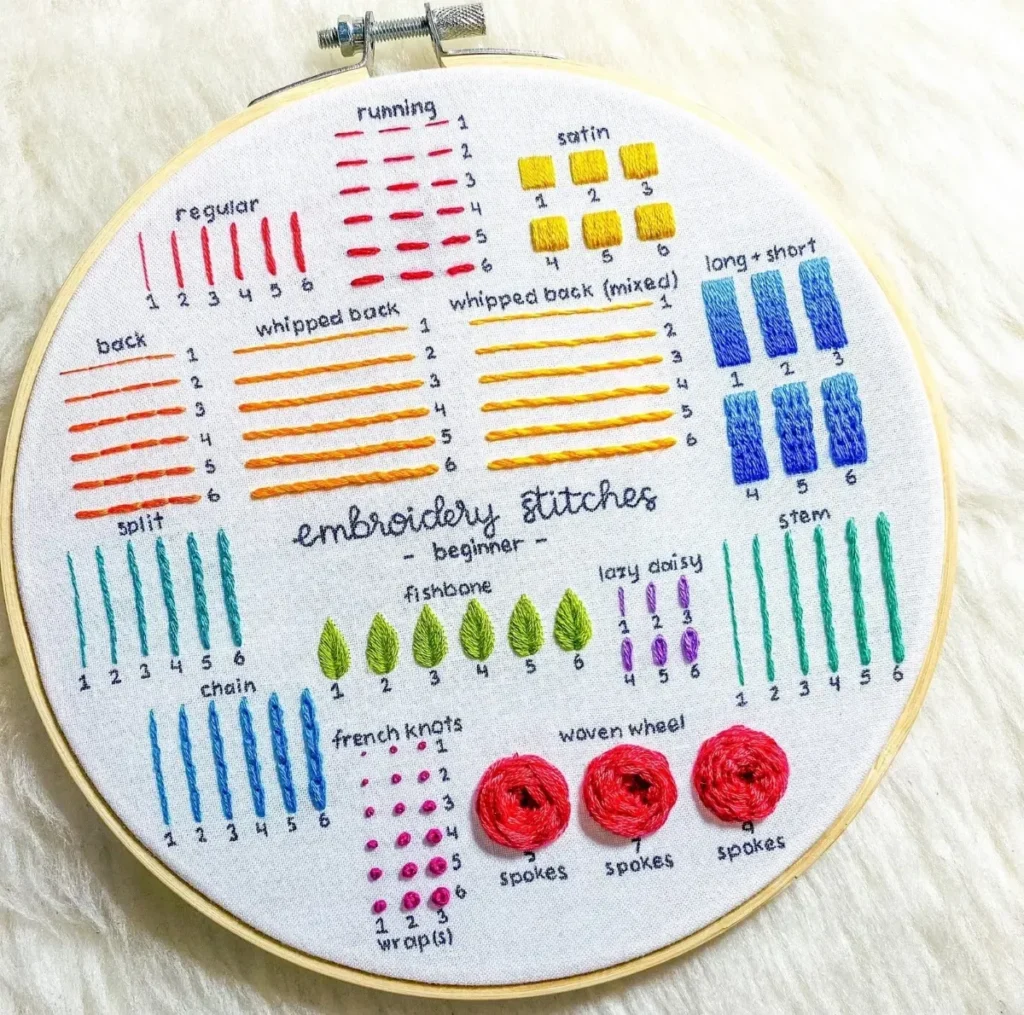
The core stitches—running stitch, backstitch, satin stitch, French knot, and stem stitch—form the backbone of most embroidery projects. Mastering these basic embroidery stitches builds confidence and reveals how line, texture, and density change the feel of your work. This foundation comes directly from embroidery basics, setting you up for a smooth, repeatable practice routine.
Practice on scrap fabric to build muscle memory and consistent technique. Focus on even stitch length, uniform tension, and clean transitions between stitches. By repeating the five core stitches, you’ll see how variations in angle or density affect the final look, reinforcing your grasp of basic embroidery stitches and preparing you for more complex motifs.
Transfer, Layout, and Color Planning: Building Your First Design
Transferring a design accurately is the first real step after choosing your motif. Use tracing paper, a lightbox, or carbon transfer to place the pattern where you want it, then double-check alignment before you start stitching. This transfer phase sets the stage for a clean, balanced layout and mirrors the guidance you’d find in a beginners embroidery guide.
Color planning completes your design’s personality. Limit the palette to 3–6 colors, plan light, mid, and dark values, and consider thread sheen for highlights. Think about how your fabric’s weave interacts with color density and how contrast can make your motif pop. These decisions connect to embroidery basics and help you build a cohesive, professional-looking piece.
Choosing Hoop Setup and Stabilizers for Different Fabrics
Hoop setup and stabilizers are essential tools for consistent results. Choose the right hoop size to match your fabric area, and select a stabilizer that suits the fabric type—tear-away or cut-away—to prevent distortion. Focusing on hoop setup and stabilizers can make or break your first projects on stretch or delicate fabrics.
Fabric choice matters as much as stitch selection. Heavier, tightly woven fabrics hold stitches well, while knits or loosely woven fabrics may benefit from a light stabilizer underneath. Understanding how fabric behaves helps you decide when to add stabilizers and how to adjust tension, which in turn supports cleaner lines and fewer puckers.
From Sketch to Stitch: A Simple Starter Project
From sketch to stitch, this starter project gives you a safe, manageable goal. Plan a small motif—about 3–4 inches—that fits inside a hoop or on a garment panel. Outline your approach and prepare transfer marks so you can focus on achieving clean lines and balanced density.
Proceed in clear steps: outline with backstitch, fill with satin stitch for bold color blocks, and add small details with French knots or stem stitches. Secure threads when finished, trim tails, and gently press from the back. Completing this simple project demonstrates how Embroidered Design for Beginners can turn a blank fabric into a wearable or display-worthy piece.
Finishing, Care, and Progression: Elevating Your Embroidered Design
Finishing and care ensure your work lasts. Secure all threads at the back, knot or tie ends neatly, and choose a gentle wash method—hand wash or machine wash on a gentle cycle with mild detergent. Air dry and press from the back with a cloth to protect the embroidery surface and preserve stitch integrity.
Progression comes with practice and curiosity. Build on what you’ve learned about embroidery basics by tackling larger motifs or combining stitches for added texture. Let this beginners embroidery guide mindset guide you as you plan new projects, expand your color palettes, and gradually increase complexity while keeping the process enjoyable.
Frequently Asked Questions
What is Embroidered Design for Beginners, and how does it relate to embroidery basics?
Embroidered Design for Beginners is a structured approach to learning embroidery from the ground up. It emphasizes mastering embroidery basics, selecting beginner-friendly fabric and threads, transferring designs, and practicing core stitches with a patient, repeatable routine. To get started, plan a small motif, choose a limited color palette, prep your fabric, and set up a hoop to organize your stitches.
Which basic embroidery stitches should I learn first in Embroidered Design for Beginners, and how do they shape my project?
In Embroidered Design for Beginners, start with the basic embroidery stitches that form the foundation of most projects: running stitch, backstitch, satin stitch, French knot, and stem stitch. Mastering these stitches helps you control line work, filled areas, and texture, making it easier to progress to more complex motifs. Practice on scrap fabric to build muscle memory before stitching your main design.
How should I handle fabric prep for embroidery and hoop setup when starting Embroidered Design for Beginners?
For Embroidered Design for Beginners, fabric prep for embroidery begins with washing and pressing your fabric to remove sizing. Choose easy fabrics like cotton or linen, then set up a small hoop or frame to keep the fabric taut. If you’re stitching on stretchy or delicate textiles, add a light stabilizer underneath and avoid over-tight hooping to prevent puckering.
What are effective methods to transfer a pattern in the beginners embroidery guide for Embroidered Design for Beginners?
To transfer a pattern as part of the beginners embroidery guide for Embroidered Design for Beginners, use a light marker, tracing paper, or a lightbox to place the design accurately. You can also transfer a paper pattern with carbon transfer paper or print-and-trace methods—choose the option that feels most comfortable and repeatable for you.
What constitutes a simple starter project for Embroidered Design for Beginners, and how should I plan the layout?
A simple starter project for Embroidered Design for Beginners is a small motif about 3–4 inches in size. Plan the layout first, transfer the pattern accurately, then outline with backstitch, fill with satin stitch or long-and-short stitches, and add a few details with French knots or stem stitches. Finish by securing threads, trimming excess, and gently pressing from the back.
What common challenges might I encounter with Embroidered Design for Beginners and how can I fix them?
Common challenges in Embroidered Design for Beginners include skipped stitches, puckering, thread fraying, and uneven fills. Fix them by slowing down, re-anchoring at the start of segments, loosening tension or using a stabilizer for delicate fabrics, and keeping thread lengths short to reduce tangling. With practice, your lines become steadier and your color transitions smoother.
| Aspect | Key Points | Practical Tips |
|---|---|---|
| Purpose and Beginner Focus | Embroidery is a timeless craft; the guide centers on Embroidered Design for Beginners, guiding you from a blank fabric to a finished wearable or display-worthy piece. | Start with basics, build momentum, and keep projects simple to develop muscle memory. |
| Starting Point | Choose simple motifs with clear lines and a limited color palette to reduce cognitive load and build confidence. | Practice with small, repeatable shapes. |
| Tools, Materials, and Prep | Fabric: cotton/linen; Threads: 3-6 colors; Needles; Hoop; Scissors/markers; Stabilizers (optional); Prep: wash/press and pattern transfer. | Use light fabrics and a small hoop; set up a clean workspace. |
| Transferring and Basic Stitches | Simple transfer; core stitches: running, backstitch, satin, French knot, stem stitch. | Practice on scrap fabric before the main piece. |
| A Simple Starter Project | Plan a 3-4 inch motif; transfer pattern; outline with backstitch; fill with satin or long-and-short; add details; secure and finish. | Begin with a straightforward motif; check symmetry and spacing. |
| Color, Composition, and Design Ideas | Limit palette to 3-6 colors; plan light/mid/dark values; use contrast; consider fabric weave; finish/presentation options. | Draft a color plan before stitching; test on swatches. |
| Common Challenges | Skipped stitches, puckering, fraying, color bleeding; fixes: slow down, stabilize, shorter thread length, test colorfastness. | Practice on scrap fabric; monitor tension; re-anchor when starting new segments. |
| Finishing, Care, and Progression | Backing, care, washing, ironing, finishing touches; progression toward wearable or display pieces. | Add stabilizer behind areas if needed; gentle care extends life. |
| Conclusion/Takeaway | With fundamentals and patience, you transform plain fabric into meaningful pieces; Embroidered Design for Beginners grows confidence and skill. | Keep practicing and celebrate each completed piece. |
Summary
Embroidered Design for Beginners opens the door to a creative world where a blank piece of fabric becomes a finished, wearable, or display-worthy piece. This guide highlights a practical path: start with beginner-friendly fabrics and threads, learn a handful of core stitches, master simple pattern transfers, and complete a small starter project. By focusing on steady progress, thoughtful color planning, and mindful composition, you’ll build confidence quickly and expand your embroidery skills. Embroidered Design for Beginners emphasizes patient practice, careful prep, and playful experimentation, turning everyday surfaces into expressive, handmade items that reflect your growing skill and personal style.