
Embroidered patches on accessories have exploded in popularity, turning everyday items into personal canvases that tell a story about your tastes, travels, and memories. In this era of embroidered patches fashion, a small, colorful patch can transform a plain cap, bag, or jacket into a unique piece that reflects your distinctive style and personality. Patches are a fun, affordable way to refresh old favorites without committing to a full wardrobe overhaul, and they invite you to experiment with textures, colors, patch accessory ideas, and patch types. This guide also covers how to apply embroidered patches, along with patch placement tips and DIY embroidered patch styling to help you mix, layer, and position elements for maximum impact. Whether you’re into minimalist accents or bold, collage-like assemblages, there’s a world of possibility behind each patch added to your gear, from hats to jackets to bags.
This concept can also be described as stitching decorative badges onto everyday gear—a trend that blends craft, personal storytelling, and sustainable fashion. Think of fabric emblems, sew-on pins, or textile adornments that enhance bags, caps, and jackets without altering the item’s core design. From a design standpoint, adopting patches is about texture, color theory, balance, and narrative alignment rather than mere decoration. By framing the idea as wearable embroidery elements and artful fabric accents, you tap into broader conversations in fashion, DIY culture, and upcycling.
Embroidered patches on accessories: A trend in Embroidered Patches Fashion
Embroidered patches on accessories have moved from niche DIY to mainstream style, turning everyday items into personal canvases that tell a story. This approach sits at the heart of embroidered patches fashion, where thoughtful patch placement tips help you balance a single focal patch on a cap or boldly scatter several across a tote. The right placement can transform a simple item into a statement of personal taste, without needing a complete wardrobe refresh.
Understanding how to apply embroidered patches is a core skill for sustainable style. You’ll discover that choosing between iron-on and sew-on options, depending on fabric and wear, influences both look and longevity. This knowledge also sets the stage for DIY embroidered patch styling that suits your daily routine, whether you prefer minimalist accents or a collage of motifs that read like a mini gallery on your accessories.
Patch Accessory Ideas: Fresh Ways to Personalize Hats, Bags, and More
Patch accessory ideas offer a structured way to remix items you already own. Start with a central theme—nature, travel, or retro vibes—and choose patches that echo that story across hats, bags, and jackets. This approach helps you build a coherent look without overloading any single piece, and it invites playful experimentation with scale and color.
Layering smaller accents around one bold centerpiece creates visual rhythm and balance. Mix textures, such as embroidered patches with PVC or leather-backed designs, to add contrast. Whether you’re patching a backpack or a wallet, these ideas serve as a practical starting point for cohesive styling that remains easy to update over time.
Mastering Patch Placement: Techniques for Maximum Impact
Mastering patch placement starts with a clear anchor and a plan for how pieces relate to seams and edges. Patch placement tips include testing layouts on a flat surface before affixing anything, so you can see how weight, color, and motif distribution read at a glance. This strategic approach helps avoid awkward overlaps and ensures the final layout feels intentional rather than accidental.
Different fabrics demand different strategies. Cotton and denim welcome bold, central pieces, while knits may require smaller patches and stabilizers to prevent distortion. Leather surfaces benefit from carefully chosen patches designed for durability, with topstitching that preserves texture. A well-planned placement aligns with garment lines and stitching, creating a cohesive silhouette rather than a patchwork jumble.
DIY Embroidered Patch Styling: Create Cohesive, Personal Looks
DIY embroidered patch styling invites you to design looks that are truly yours. Begin with a mood board of themes and color stories, then test layouts on a flat surface before committing. This approach supports DIY embroidered patch styling that feels deliberate, whether you’re building a small collection for everyday wear or a bold editorial-on-a-garment statement.
As you assemble patches, consider harmony across items. Pair motifs that share color families or edges that align with garment seams. A cohesive patch story emerges when you mix large, graphic designs with smaller accents that echo their tones, turning simple hats and bags into curated expressions of personal taste.
How to Apply Embroidered Patches: Step-by-Step for Durable Results
How to apply embroidered patches begins with selecting patches that suit your fabric and care plan. For lightweight fabrics, iron-on patches can be quick and convenient, while sew-on variants offer a longer-lasting hold for high-friction areas. Preparing the surface—clean, dry fabric and a thin cloth between patch and garment—helps edges stay neat and reduces risk of curling.
Secure and test the patch before committing completely. Apply heat with steady, even pressure for the recommended duration and allow to cool fully for iron-ons; for sew-ons, use a tight running stitch or zigzag stitch to secure borders. After attachment, finish by wiping away border residue and turning items inside out or following care instructions to prolong patch life, especially through washes and wear.
Materials, Finishes, and Care for Patches on Fabrics
Choosing the right materials matters for durability and appearance. Lightweight cottons and denim are highly patch-friendly, while knits and stretch fabrics may require stabilizers or specific stitch choices to prevent distortion. Leather and vinyl surfaces benefit from patches designed for those textures, ensuring a smooth attachment and lasting adhesion.
Care and maintenance extend patch life. Wash patches inside-out on a gentle cycle, air-dry when possible, and avoid prolonged high heat after application. Regularly check for loose threads on sewn patches and re-stitch as needed. Storing patched items away from direct sunlight helps prevent color fade, keeping your patchwork vibrant and ready for everyday wear.
Frequently Asked Questions
Why are embroidered patches on accessories such a popular fashion trend?
Embroidered patches on accessories are a quick, affordable way to personalize hats, bags, jackets and more. They transform a plain item into wearable art, allowing you to express color, motif and texture without a full wardrobe overhaul.
How to apply embroidered patches on accessories?
Choose patches suited to the fabric and decide between iron-on or sew-on methods. Prepare the surface, apply heat or stitching as appropriate, and then test for secure adhesion. Finish by letting the patch cool and caring for the edges.
What are patch placement tips for embroidered patches on accessories?
Plan a focal point, aim for symmetry or intentional imbalance, and follow seams or natural lines. Test layouts on a flat surface before permanent attachment, and avoid overcrowding by leaving negative space for balance.
Which accessories work best for embroidered patches on accessories, and what patch accessory ideas should you try?
Hats, bags, jackets and sneakers are all great canvases. Patch accessory ideas include a bold center patch on a hat, a central motif on a bag, or a cluster across a denim jacket to tell a theme or story.
How should you care for embroidered patches on accessories to maximize longevity?
Wash patches inside-out on a gentle cycle and air dry when possible. For iron-on patches, avoid high heat after application, and for sewn patches, check for loose threads and re-stitch as needed.
How can DIY embroidered patch styling help you create cohesive looks with patches on accessories?
Use DIY embroidered patch styling to plan color palettes, test layouts, and layer patches with varying sizes. Group related motifs, maintain consistent gaps, and align patches with seams to build a cohesive, personalized look.
| Key Point | Summary |
|---|---|
| Popularity & Purpose | Patches turn everyday items into personal canvases; a small patch can transform hats, bags, or jackets. They’re an affordable, fun way to refresh favorites and express your style. |
| Concept & Scope | Embroidery patches blend craftsmanship with personal expression. This guide covers basics—how to apply patches, where to place them for impact, which accessories benefit most, and how to care for patches. |
| What You’ll Learn | Practical how-to steps, design tips, and a range of patch ideas. Learn patch placement to avoid overlaps, understand fabrics and finishes, and explore layering for a cohesive look across hats, bags, jackets, sneakers, belts, phone cases, and more. |
| Hats & Headwear | Hats are an easy entry point. Start with one patch on the front, or create a row along the brim. For a retro vibe, cluster patches symmetrically at the crown. Consider fabric when choosing patches. |
| Bags & Backpacks | Bags offer a larger canvas. Use a central showpiece with supporting patches to echo a theme. For leather, choose patches designed for leather and add light topstitching for longevity. |
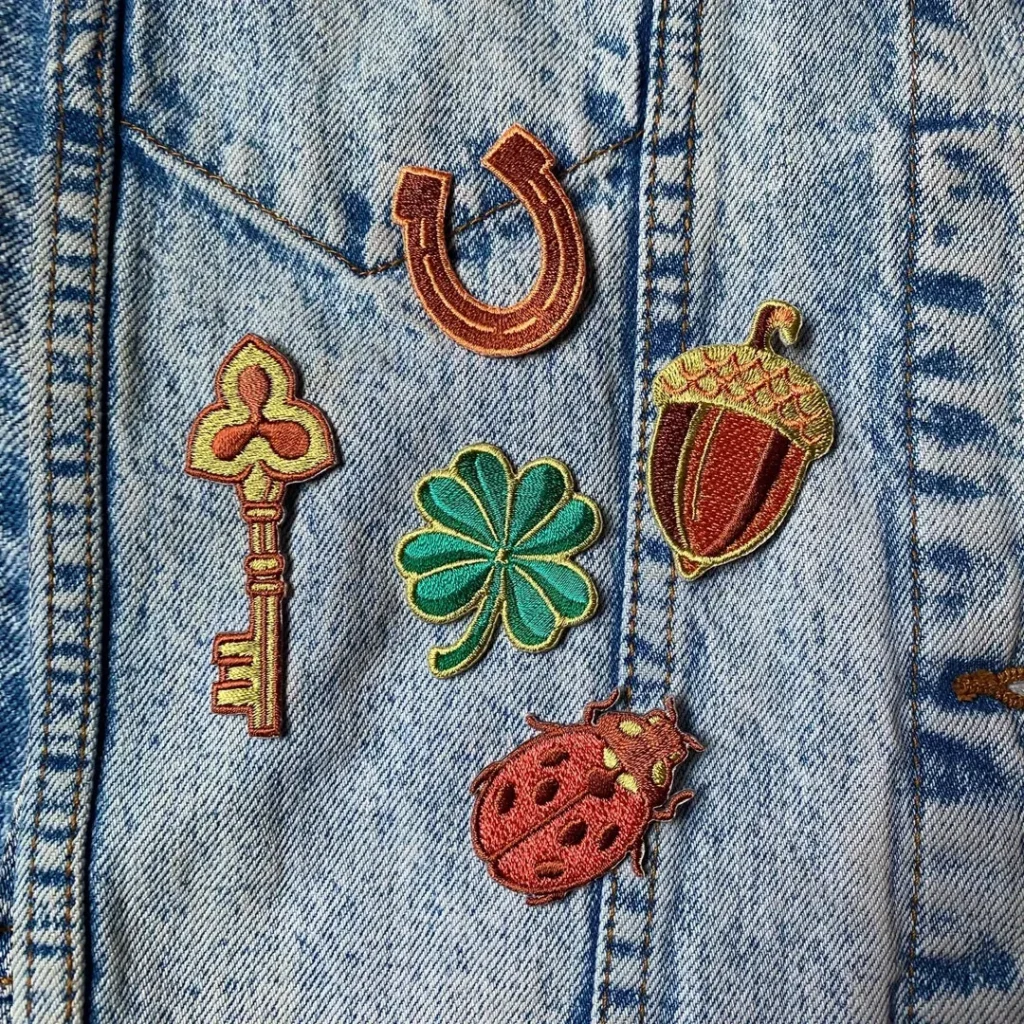
| Jackets & Denim | Jackets and denim hold patches well and support larger layouts. Start with a foundation patch on a prominent area (back panel or shoulder), then build with coordinating smaller patches. |
| Sneakers & Accessories | Patches on sneakers add playful detail. Use iron-on or sew-on patches on fabric sneakers; for leather surfaces, use leather-friendly patches. Extend patching to belts, wallets, or phone cases for a cohesive look. |
| Practical Guidance: How to Apply | Choose patches suited to the fabric and care plan. For light fabrics, iron-on patches are quick; sew-on patches offer durability. Prepare the surface, apply heat with even pressure, test, and then finish with proper care. |
| Care, Materials & Compatibility | Not all fabrics respond the same. Cotton and denim are patch-friendly; knits may need stabilizers. Test patches on a small area, and note that sew-on patches can outperform iron-ons in high-friction zones. |
| Styling & Layering | Coordinate colors and themes. Use two to three dominant colors and mix larger with smaller patches. Anchor with a large patch and layer others to maintain balance. |
| DIY Ideas & Inspiration | Start small (a single accessory) and build. Try color-blocking, layered belts, or patch-covered totes. Explore vintage or modern patches and group designs around a shared motif. |
| Sourcing & Finding Patches | Patches come in various shapes and materials. Consider usage, color compatibility, and finish. Starter packs and limited editions can help you experiment with a cohesive theme. |