
Embroidered Design Tips for Beginners can feel mysterious at first, especially if you don’t know where to start. That sense of mystery fades quickly when you break the craft into a routine of small steps, reliable tools, a comfortable workspace, and a friendly plan that keeps you moving forward. By focusing on basics — materials, fabric preparation, simple stitches, tension control, and neat finishing — you’ll build a strong foundation you can trust with any project. As you practice, you’ll notice your stitches becoming neater, your tension more even, and your color placements reading clearly on fabric. This approachable starting point creates a repeatable workflow that turns curiosity into competence and makes the journey enjoyable from the first test swatch to a finished piece.
In practical terms, learning embroidery for beginners means translating ideas into a tiny set of repeatable actions: prepare your materials, secure your fabric in a hoop, sketch or trace a simple motif, and then move through stitches in orderly steps. Think of stitching as a conversation between thread and fabric, where the goal is even tension, consistent stitch length, and clean transitions from outline to fill. To set up a solid starter project, pick a tiny motif, keep the color palette restrained, and work in short sessions that end with a sense of accomplishment rather than fatigue. As you gain confidence, you’ll shift from outlining to shading, from single-color fills to gentle blends, always returning to a core routine of preparation, stitching, and securing threads. Along the way, you’ll want to recognize common embroidery mistakes to avoid, such as hoop slippage, uneven tension, tangled tails, and skipped transfers, which can undermine even well-executed stitches. LSI-oriented guidance highlights foundation stitches, tension management, fabric grip, thread control, and color planning—concepts that echo throughout beginner embroidery techniques and connect to broader craft outcomes. A practical mindset also means embracing short, focused practice projects that resemble real-world tasks, such as embellishing a plain pocket, a napkin edge, or a decorative patch, so you can see how theory translates into tangible results. By maintaining a minimal kit—sharp needles, a few floss colors, a small pair of scissors, and a sturdy hoop—you reduce friction and create opportunities for steady, repeatable progress. Documenting your experiments in a simple notebook or photo journal helps you track what works, what needs adjustment, and how your skills evolve over time. With consistency and curiosity, you’ll find yourself tackling more ambitious projects with confidence, and the day you turn a simple motif into a polished piece will feel like a genuine achievement.
Embroidered Design Tips for Beginners: Start with the Right Materials and Workspace
Embroidery success begins long before your needle ever touches fabric. Setting up a comfortable workspace with good lighting, a sturdy table, and a properly sized embroidery hoop creates the foundation for tidy stitches and steady tension. Choosing a smooth fabric like cotton or linen helps you see your work clearly and makes it easier to manage embroidery design tips for beginners as you progress. The right tools—sharp needles suited to your thread, quality floss, and a small pair of scissors—reduce frustration and contribute to cleaner finishes. This is the stage where preparation meets practice, and it aligns with a practical approach to embroidery design tips for beginners that emphasizes reliability over flair from day one.
In this phase, begin with a small, simple motif and a limited color palette to keep the process approachable. Lightly sketch or transfer the design onto fabric, then secure it in a hoop to minimize shift. By focusing on essential supplies and a clear plan, you establish a routine that makes subsequent projects feel achievable. This mindset—prioritizing consistent setups and incremental gains—embodies the core idea of embroidery design tips for beginners: you build confidence by mastering a few fundamentals before expanding to more complex techniques.
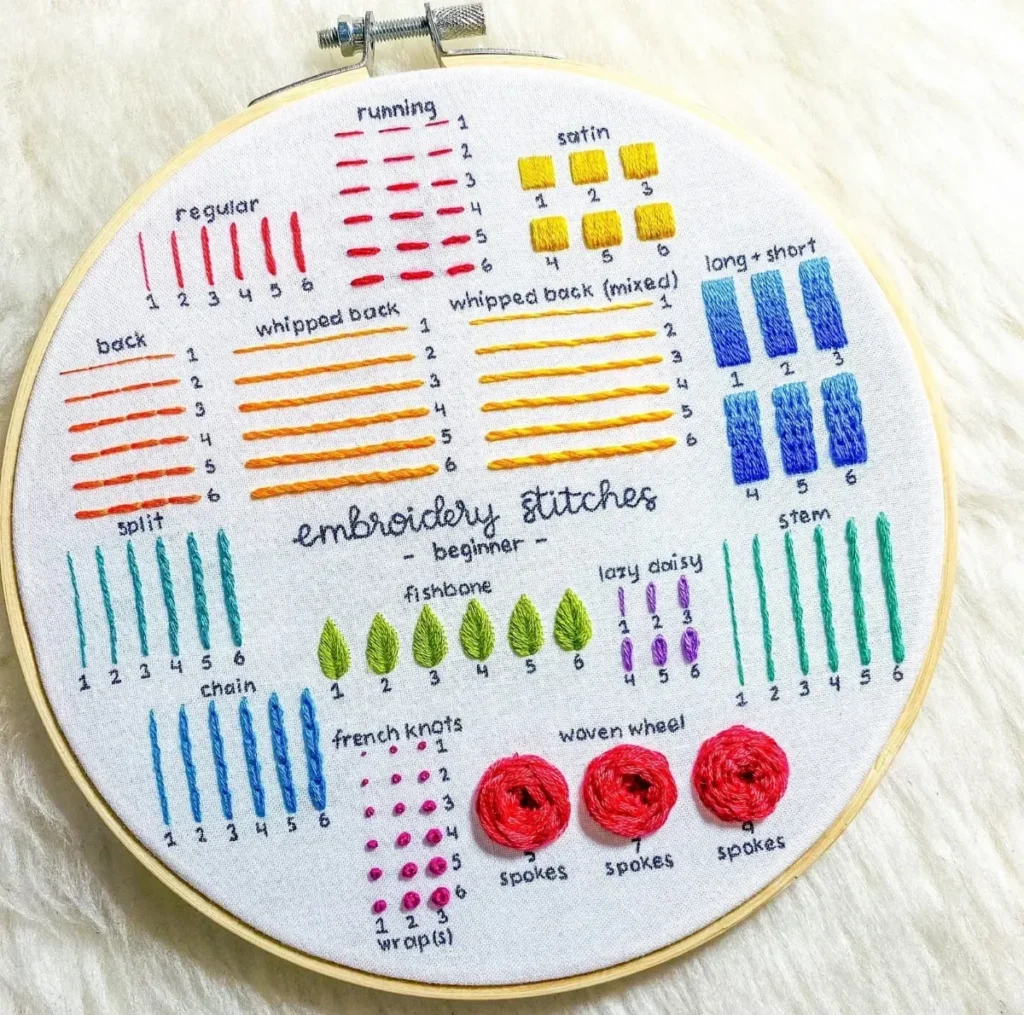
Mastering Beginner Embroidery Techniques: From Backstitch to Satin Stitch
Starting with core stitches gives you a reliable toolkit for most projects. Backstitch provides crisp outlines, running stitch offers texture and speed, and satin stitch delivers smooth, dense fills. These beginner embroidery techniques form the backbone of early practice, helping you learn how different stitches interact with fabric and thread. As you work, pay attention to gentle, even tension and the way stitches sit next to each other; the goal is smooth lines and minimal puckering, which reinforces successful embroidery stitching tips for beginners that you can reuse across designs.
Practice sessions built around these foundational stitches produce steady improvement. Set small, measurable goals—such as finishing a simple motif with clean edges or achieving uniform stitch length—and track your results. By repeating deliberate actions, you’ll notice your control over needle, thread, and fabric improves, translating into greater accuracy and a growing sense of mastery over beginner embroidery techniques. Over time, you’ll introduce subtle variations and color layering with confidence, knowing the basics are solid.
Avoiding Common Embroidery Mistakes: Practical Guardrails for Consistent Results
Common embroidery mistakes to avoid often stem from timing, tension, and pattern management. When fabric is not properly stabilized in the hoop, you’ll see puckering and uneven surfaces even if your stitches are technically correct. Skipping pattern transfers or misplacing stitches leads to misaligned designs, while pulling too tightly can fray threads or distort fibers. Recognizing these hazards early helps you establish a clean workflow that reduces retry work and keeps your project moving forward.
To counter these issues, implement practical guardrails: check the hoop’s tension before you start, re-check your pattern lines as you stitch, and mark stitch order with a light erasable pen. If you notice threads snagging or fibers resisting, adjust needle size or floss weight and keep your pull gentle and consistent. With these guardrails in place, you’ll minimize common embroidery mistakes to avoid and maintain a smooth progress rhythm across various projects.
Embroidery Stitching Tips for Beginners: Achieving Clean Lines and Uniform Tension
A key focus for beginners is achieving clean lines and even coverage. To reach this goal, follow embroidery stitching tips for beginners that emphasize controlled motion, consistent stitch length, and correct thread handling. Start with short, evenly spaced stitches and avoid long, continuous runs that tend to snag or warp. Maintaining consistent thread tension prevents gaps, while keeping the fabric flat in the hoop reduces shifting and puckering, resulting in a neater overall appearance.
Another actionable tip is to bury thread ends securely and trim excess close to the fabric. Practicing these techniques on simple shapes helps you build muscle memory for precise starts and stops, which are essential when you tackle more detailed patterns. As you grow more comfortable with stitch geometry, your lines become straighter, your color fills more uniform, and your embroidery projects become more polished.
Simple Embroidery Projects for Beginners: Quick Wins to Build Confidence
Starting with small, achievable embroidery projects helps you apply the lessons from earlier sections without feeling overwhelmed. Choose motifs that fit easily within a hoop and use a restrained color palette to practice consistent tension and smooth color transitions. These embroidery projects for beginners serve as tangible milestones, reinforcing core skills like backstitch outlines, satin-filled areas, and neatly finished edges, while reinforcing the habit of keeping a steady, patient pace.
As confidence grows, you can gradually introduce light shading, subtle texture, and more color variety. Document each project—notes on stitch choices, tension, and color pairing—so you create a personal reference you’ll revisit for future embroidery projects for beginners. The aim is to accumulate a small portfolio of accessible pieces that demonstrate progress and keep your motivation high.
Sustaining Growth with Practice, Color, and Documentation: A Roadmap for Embroidery Projects for Beginners
Long-term progress comes from deliberate practice and thoughtful planning. Build a routine that includes regular stitching sessions, curated color palettes, and small design challenges that push your technique without overwhelming you. When you document each step—what worked, what didn’t, and which patterns sparked the most satisfaction—you create a living guide that reinforces the embroidery projects for beginners mindset and helps you scale up to more complex pieces.
Finally, expand your practice by rotating motifs, experimenting with thread weights, and gradually increasing design complexity. A well-kept practice log makes it easier to track improvement over time and to reuse successful combinations in future projects. By developing a habit of reflection and steady iteration, you’ll see consistent gains in stitching quality, precision, and design execution, turning beginner-friendly tips into a durable skill set for any embroidery journey.
Frequently Asked Questions
What are essential embroidery design tips for beginners to get started successfully?
Start with a comfortable workspace, a suitable hoop, and a smooth fabric like cotton or linen. Use sharp embroidery needles, good floss, and small scissors to reduce frustration. Master a few beginner stitches—backstitch, running stitch, and satin stitch—while keeping tension gentle and consistent. These Embroidered Design Tips for Beginners help you build accuracy and confidence, leading to cleaner lines and crisper fills over time.
From the Embroidered Design Tips for Beginners, what are the common embroidery mistakes to avoid?
Common embroidery mistakes to avoid include hoop slippage, uneven tension, skipped transfers, wrong needle size, and knotting issues. To prevent them, keep the hoop taut but not stretched, re-check your pattern before you start, and transfer lines clearly. When in doubt, reference Embroidered Design Tips for Beginners to spot and fix issues early.
Which beginner embroidery techniques should I learn first according to Embroidered Design Tips for Beginners?
Beginner embroidery techniques to learn first include backstitch for outlines, running stitch for texture, and satin stitch for fills. Practice short, even stitches with consistent thread tension, and gradually build up confidence. Following Embroidered Design Tips for Beginners gives you a solid foundation for more complex projects.
What embroidery stitching tips for beginners help produce clean, flat stitches?
Embroidery stitching tips for beginners focus on staying in control: keep fabric stable in the hoop, use short, even stitches, and maintain gentle tension. Avoid over-tightening to prevent puckering, bury thread ends, and trim close for a clean finish. These tips, drawn from Embroidered Design Tips for Beginners, help your work look smooth and professional.
What are simple embroidery projects for beginners to build confidence with Embroidered Design Tips for Beginners?
Try simple embroidery projects for beginners such as a tiny flower motif or a geometric shape. These let you apply Embroidered Design Tips for Beginners in a manageable time frame and build confidence. As you improve, tackle clothing embellishments, decorative napkins, or small wall hangings to practice color, density, and stitch control.
How should I plan color and design for embroidery projects for beginners?
Plan color and materials for embroidery projects for beginners by choosing natural fibers and a limited palette that suits your fabric. Start with a small motif to learn how stitches read, and gradually add shading with lighter or darker threads. This thoughtful approach aligns with Embroidered Design Tips for Beginners and helps keep progress steady.
| Topic | Key Points |
|---|---|
| Mindset and approach | – Start with learning, practice, and iteration; focus on a reliable foundation rather than rushing to advanced techniques. – Emphasize steady progress and building confidence through repetition. |
| Workspace setup | – Create a comfortable, well-lit workspace with a sturdy table and an appropriate embroidery hoop. – Use simple fabrics (cotton/linen) to clearly see tension; ensure hoop tension is snug but not distorted. |
| Materials and planning | – Choose natural fibers and a small, uncomplicated design. – Lightly sketch or transfer the motif; limit color palette to keep the design readable. |
| Stitches (basics) | – Learn backstitch (outlines), running stitch (texture), and satin stitch (dense fills). – Focus on even tension: don’t pull too tight or too slack. |
| Common mistakes to avoid | – Hoop slippage, uneven tension, puckering, and skipped transfers. – Remedies: keep fabric taut (but not strained), mark design clearly, and test tension before stitching. |
| Practical workflow (starter) | – Choose a tiny motif; prepare fabric and hoop. – Outline with backstitch (one strand for delicate lines, two for bolder lines). – Add color fills gradually with satin or simple fills; keep stitches short and neat. – Finish with a secure knot, bury thread tail, and press from the back. |
| Color and design planning | – Start with a limited palette that matches the fabric; introduce subtle shading with lighter/darker threads as needed. – Plan color relationships to ensure readability and cohesion. |
| Finishing touches | – Use fabric pencils or erasable markers for transfers; set ink as needed. – Consider framing under glass or a light pressing to protect the work; document progress with photos. |
| Practice and progression | – Maintain a practice notebook to track stitches used, tension, color trials, and mistakes. – Regular practice yields steadier technique and more confident design execution. |
| Starter project example | – Start with a tiny motif (flower or geometric shape). – Prepare fabric, hoop, and transfer the design clearly. – Outline with backstitch; add a few color fills with satin or simple stitches. – Keep stitches even, finish neatly, and press carefully. |