
DIY Embroidered Patches offer a playful way to personalize clothes, bags, and accessories with color, texture, and a touch of whimsy that reflects your personality and mood. If you’ve ever wondered how to make embroidered patches at home, you’re about to discover a practical, satisfying craft that doesn’t require a couture studio or expensive equipment, just patience and curiosity. This overview blends simple step-by-step guidance with design ideas for embroidered patches and tips on choosing patch embroidery supplies for beginners, including needles, thread, stabilizers, and versatile fabrics, plus a helpful step-by-step embroidery patches tutorial you can follow. From selecting fabrics to finishing edges, you’ll learn practical techniques, transfer methods, and how a few stitches can transform a plain piece into wearable art you’ll be proud to show off. Whether you’re patching a jacket or decorating a backpack, this friendly guide also points you toward a DIY embroidered patches tutorial you can trust, along with ideas for testing your stitches on scraps before committing.
At-home textile badges allow you to personalize jackets, bags, and hats through careful stitching, turning plain fabric into wearable statements. This approach relies on everyday sewing tools and basic stitches, making the craft accessible to beginners seeking a step-by-step embroidery patch project. Think of it as handcrafted insignias that can be ironed on or sewn for durability, opening up design concepts for fabric embellishments across wardrobes. Starting with a few supplies and a simple motif, you can build momentum toward more intricate stitched emblems, creating a small portfolio of patch art. For extra inspiration, explore beginner-friendly guides and community galleries that celebrate color, texture, and personal storytelling through stitched patches.
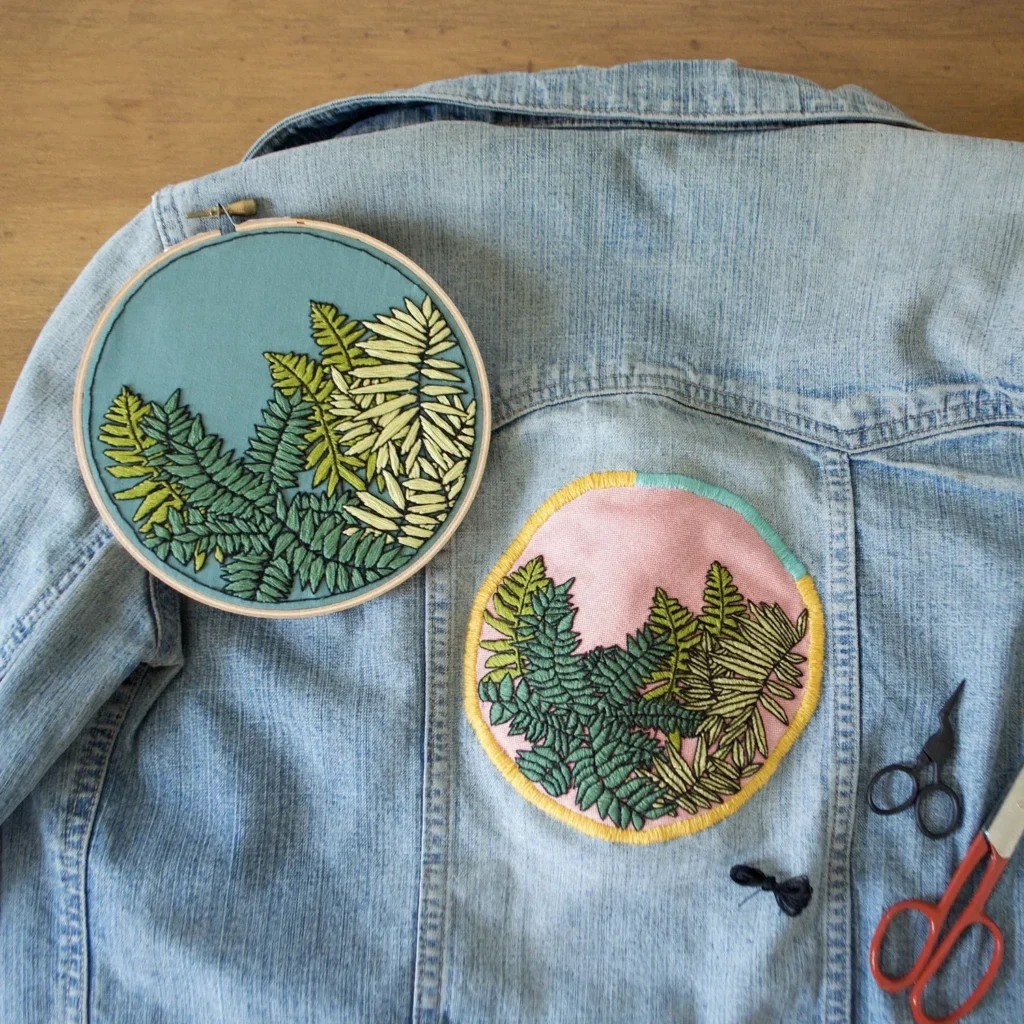
DIY Embroidered Patches: Your First Design at Home
DIY Embroidered Patches offer a hands-on way to turn fabric into wearable art without a studio. Start by imagining a simple motif and translating it into bold shapes and clean outlines. This is the moment to explore the core ideas behind how to make embroidered patches and set a small, achievable goal for your first project.
In a DIY embroidered patches tutorial, you’ll learn to translate sketches into stitches, pick color palettes that suit your fabric, and select beginner-friendly techniques. Embrace the process, gather a few basic supplies, and approach your first patch with curiosity and patience as you build confidence with every stitch.
Essential Tools and Patch Embroidery Supplies for Beginners
A solid patch starts with the right tools. For beginners, focus on essential items that make the process smoother: a sturdy fabric base, a suitable stabilizer, an embroidery hoop, and a selection of embroidery needles and threads. Having these patch embroidery supplies for beginners on hand makes the step-by-step journey feel approachable rather than daunting.
Backing options, scissors, a fabric marker, and a reliable iron help you finish patches cleanly. When you’re starting, opt for simple, reliable materials—like cotton twill for the base and a tear-away stabilizer—that keep stitches neat and reduce puckering, so your design looks polished from the first patch.
Design Ideas for Embroidered Patches to Spark Creativity
Design ideas for embroidered patches are virtually endless, from nature motifs to playful monograms. Consider simple shapes, then layer in a few colors to tell a tiny story on fabric. With practice, you can expand into more intricate elements that push your skills while staying mindful of the 2–3 inch patch size that works well for most garments.
Experiment with themes like leaves, animals, quotes, or abstract shapes. Each idea can be adapted to different shapes—round badges, rectangles, or custom contours—while keeping your color palette manageable. This is where the concept of how to make embroidered patches becomes a creative exercise in storytelling through stitchwork.
Step-by-Step Tutorial: From Sketch to Finished Patch
A step-by-step embroidery patches tutorial helps you move from an idea to a tangible patch. Start by preparing your fabric, stabilizer, and transfer of the design, then hoop the fabric securely to keep stitches even. This foundational phase sets the tone for clean lines and durable edges.
Continue with outlining, filling, and detailing, using backstitch for the outline and satin stitches for bold areas. Finish by attaching a backing and securing the edges with a neat border. Following these steps ensures you learn how to make embroidered patches that look professional and withstand washing.
Finishing and Attaching: Backings, Edges, and Care
Choosing a backing is a key finishing decision. Iron-on backings offer quick adhesion, while sew-on or felt backings provide stronger, longer-lasting wear. Your choice can influence how you apply the patch—whether you want a no-sew look or a durable, washable finish.
After attaching, care for patches properly: wash on gentle cycles, avoid high heat, and consider a light stitch around the edge for extra security if you expect frequent washing. Good finishing techniques help your patches maintain crisp borders and vibrant colors over time.
Build a Patch Portfolio: Showcasing Your Creative Work
A small patch portfolio helps you track progress and share your designs with friends and crafting communities. Start with a consistent size and shape, photograph patches in natural light, and create a simple catalog noting stitch types, colors, and backing choices. This approach aligns with design ideas for embroidered patches by highlighting your evolving style.
As you grow more confident, curate your collection to feature a cohesive theme or color story. Portfolio presentation isn’t just about selling patches; it’s a learning tool that answers questions like how to make embroidered patches more efficiently and how to translate design ideas for embroidered patches into a shareable body of work.
Frequently Asked Questions
What is the easiest way to start with DIY Embroidered Patches, and can you outline a step-by-step embroidery patches tutorial?
For beginners, start with a simple patch using a tight-weave fabric, a basic shape, and a limited color palette. Gather essential supplies, transfer a simple design, and follow a straightforward step-by-step embroidery patches tutorial: hoop the fabric, outline, fill, add texture, and finish with a backing. Practice on scrap fabric first, then move to a small, 2–3 inch patch to build confidence and consistency.
How to make embroidered patches at home: what is the basic process for DIY Embroidered Patches?
The basic process is to choose a fabric base, plan the shape and size, transfer your design, and secure the fabric in a hoop. Then, outline the design, fill the areas with satin or fill stitches, add any details, and finish with a backing. This keeps the project approachable for DIY Embroidered Patches while staying durable for everyday wear.
What patch embroidery supplies for beginners are essential for DIY Embroidered Patches projects?
Essential supplies include a tight weave fabric (cotton twill, denim, or felt), stabilizer (cut-away or tear-away), an embroidery hoop, appropriate embroidery needles and threads, a backing option (iron-on, fusible webbing, or felt), scissors, and a fabric marker. Optional extras like beads or sequins can add texture. Having these basics on hand makes DIY Embroidered Patches smoother and more enjoyable.
What are design ideas for embroidered patches that beginners can try with DIY Embroidered Patches?
Start with simple nature motifs (leaves, flowers), animal silhouettes, or monograms. Other beginner-friendly ideas include short quotes, abstract shapes, or small icons like hearts or stars. Plan in a two-to-five color palette and keep the patch size around 2–3 inches to build confidence while exploring design ideas for embroidered patches.
Can you summarize a step-by-step embroidery patches tutorial for a simple DIY Embroidered Patches project?
Yes: 1) Prepare fabric and stabilizer. 2) Transfer your design onto the fabric. 3) Hoop the fabric securely. 4) Choose thread colors and separate strands as needed. 5) Outline with a backstitch or stem stitch. 6) Fill large areas with satin or other fills. 7) Add details and texture with small stitches. 8) Remove from hoop and trim threads. 9) Attach backing (iron-on or sew-on) and finish edges with a neat stitch.
What backing options and finishing methods work best for DIY Embroidered Patches?
For durability, sew-on backing or a sturdy felt backing is reliable, especially on frequently washed items. Iron-on backings are convenient for quick adhesion but may require follow-up stitching around the edge for longevity. Finish with a tight satin border or zigzag stitch, then test on scrap fabric before applying to the final item.
| Topic | Key Points | Notes/Examples |
|---|---|---|
| Focus keyword | DIY Embroidered Patches | Primary term guiding the content; used for SEO and topic scope. |
| Related keywords | how to make embroidered patches; step-by-step embroidery patches tutorial; design ideas for embroidered patches; patch embroidery supplies for beginners; DIY embroidered patches tutorial | Supports SEO by targeting common search queries related to the topic. |
| Post Title | DIY Embroidered Patches: Create Your Own Designs at Home | Represents the main headline of the piece. |
| Meta Description | DIY Embroidered Patches: Learn how to make embroidered patches with a step-by-step tutorial, design ideas, and essential supplies for beginners. Great for DIY. | Brief SEO-friendly summary used in search results. |
| Blog Post – Introduction | Describes purpose and approach: a practical, step-by-step guide from idea to finished patch for beginners and hobbyists. | Sets tone and audience for the guide. |
| Why DIY Embroidered Patches matter | Portable art; customizable; upcycling; budget-friendly. | Highlights benefits and versatility of patches. |
| Tools and supplies | Fabric base; Stabilizer; Embroidery hoop; Threads; Needles; Backing options; Scissors; Marker; Iron; Optional embellishments | Essential starter kit and beginner-friendly items. |
| Design planning | Size/shape, color palette, transfer methods, planning tips | Guides how to translate ideas into patches. |
| Step-by-step embroidery patch tutorial | 9 steps from preparation to finishing:** 1) prep; 2) transfer; 3) hoop; 4) thread; 5) outline; 6) fill; 7) details; 8) finish; 9) backings | Concrete, actionable workflow for patch creation. |
| Finishing touches and backings | Backing options; edge finishing; wash/durability considerations | Important for durability and aesthetics. |
| Design ideas to inspire | Nature motifs; quotes; animal silhouettes; monograms; abstract shapes | Inspires creativity and helps plan initial patches. |
| Common issues and troubleshooting | Puckering; frayed edges; uneven stitches; color bleeding | Practical fixes to improve results. |
| Attaching patches and care | Sewing vs ironing; care instructions after washing | Guides on durable attachment and maintenance. |
| Advanced techniques | Layered textures; appliqué; mixed stitches; beads/sequins | Expands skills for experienced stitchers. |
| Portfolio design | Consistent size/shape; photo catalog; color codes; sharing designs | Helps build a cohesive collection and presentation. |
| Practical tips for beginners | Start simple; practice; quality tools; organized workspace; have fun | Encourages momentum and confidence. |
| Conclusion | Summarizes the guide and invites readers to start their own patches | Wrap-up and call to action. |
Summary
Table summarizes the base content into key topics and practical takeaways for creating DIY Embroidered Patches.