
DIY Embroidered Patches have exploded in popularity as a fun, creative way to personalize clothing, backpacks, hats, and gear. If you’re new to embroidery, patches offer an approachable entry point: you can practice basic stitches, learn about fabrics, and end up with something tangible you can wear with pride. This beginner-friendly embroidered patches tutorial covers essential supplies, simple stitching techniques, and design ideas to get you stitching confidently from day one. The course focuses on practical, bite-sized steps that build a steady hand and crisp edges. You can tailor your projects to your rhythm by choosing simple, wearable designs and techniques.
Think of these fabric adornments as appliqués or stitched badges that brighten jackets, bags, and hats. Using terms like textile embellishments, patch motifs, and decorative stitching helps connect the idea to related topics such as hand embroidery, machine stitching, and design planning. Whether you’re starting with simple shapes or building a small collection, this approach highlights the same craft from different angles, guiding readers toward practical projects.
DIY Embroidered Patches: Supplies, Tools, and Setup for Beginners
Getting started with DIY Embroidered Patches begins with gathering the right supplies and setting up a comfortable workspace. For beginners patch embroidery, assemble fabric patches or backing (denim or engineered felt work well), an embroidery hoop, a sharp needle suitable for your fabric, embroidery floss in a coordinating palette, scissors, and a marker or transfer pen. A stabilizer is especially important for delicate fabrics or machine embroidery patches to prevent puckering and keep stitches even. You may also choose iron-on adhesive or pins for quick attachment.
Decide early whether you’ll work by hand or with a sewing machine, as this affects your supplies and technique. A tidy, well-lit space helps you stay focused on the basics of this embroidered patch tutorial, while keeping your materials organized makes it easier to practice the core skills of beginners patch embroidery.
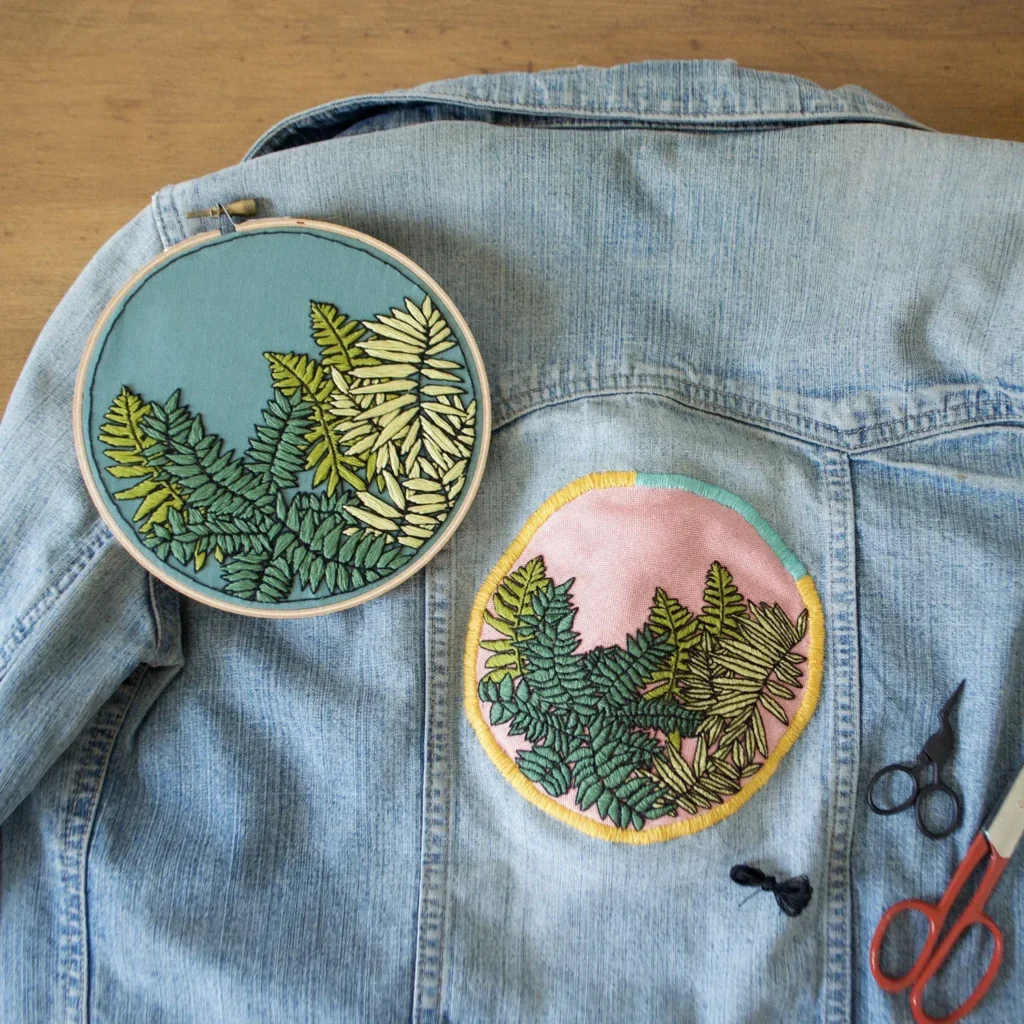
Designing Your First Patch: Simple Motifs and Planning
Choosing a simple motif with a limited color palette is ideal for beginners patch embroidery. Bold outlines translate well to embroidery and keep the design forgiving for those new to DIY Embroidered Patches. If you’re using embroidery for beginners, start with geometric shapes, a single-letter monogram, or a small animal motif. To transfer the design, use a lightbox, transfer pen, or water-soluble marker; a clear outline helps guide your stitches.
Plan the patch’s size and placement on a garment, then gather colors accordingly. Practicing on scrap fabric first lets you calibrate stitch length and tension before you commit to the final patch, and this approach aligns with many embroidered patches tutorials while supporting both hand embroidery patches and machine embroidery patches.
Hand vs Machine: Techniques for Embroidered Patches
Hand embroidery patches emphasize texture and a handmade charm. Techniques like backstitch, satin stitch, and split stitch give crisp lines and tactile surfaces that are satisfying for hand work, and they form a core part of beginner-friendly DIY Embroidered Patches.
Machine embroidery patches, by contrast, offer speed and uniformity, making them ideal for larger batches or complex designs. Stabilizers and hoops help keep fabric stable and reduce distortion, whether you’re aiming for a clean satin fill or dense fill stitches, and they’re a common focus in the machine embroidery patches workflow.
Step-by-Step Tutorial: Making Your First Patch
Transfer your design to the fabric patch using a lightbox, transfer pen, or water-soluble marker. If your fabric is prone to fraying, secure a stabilizer and place the piece in an embroidery hoop to hold the design taut while you stitch. Start with a simple stitch, such as backstitch, to outline the motif and build confidence—the core of this embroidered patches tutorial for beginners.
Fill the areas with satin stitch or long-and-short stitches to add color and depth, then finish the edges with a neat satin border. Attach the patch to your garment using iron-on backing or sew-on stitching, and care for your patch according to its backing and fabric.
Common Mistakes to Avoid in Patch Embroidery
Newcomers often struggle with tension, leading to loose stitches, or neglect stabilizers, which causes puckering along the edges. Fraying edges after finishing is another common issue that spoils a patch’s look. These are typical concerns for beginners patch embroidery and can easily derail a project if you’re not careful.
Avoid these by using a hoop or stabilizer, practicing consistent stitch length, and testing iron-on backing on scrap fabric before applying to a garment. Take time with your transfer lines and finish with a neat boundary to keep the patch durable and tidy.
Creative Ideas and Longevity: Designing with Patches
DIY Embroidered Patches unlock a world of design possibilities—from monograms to cute animals, floral motifs to abstract shapes. Mix and match patches on denim jackets, canvas totes, backpacks, hats, or sneakers for a cohesive look, and consider creating a small series in a single color palette to tell a story.
To extend the life of your patches, follow care tips: turn garments inside out before washing, use a mild detergent, and avoid high heat. If you used heat-activated backing, follow the backing’s instructions, and air-dry when possible to preserve stitching quality, whether you’re making hand embroidery patches or machine embroidery patches.
Frequently Asked Questions
What exactly are DIY Embroidered Patches and why are they popular?
DIY Embroidered Patches are fabric shapes you design, stitch, and attach to clothing, bags, or gear to personalize items. They’re popular because they’re affordable, highly customizable, and beginner-friendly, making them a great entry point for beginners patch embroidery to practice basic stitches and see a finished result quickly.
What supplies do I need for DIY Embroidered Patches?
Essential supplies include fabric patches or backing, an embroidery hoop (optional), an embroidery needle, embroidery floss in your chosen colors, scissors and a marker or water-soluble pen for transferring designs, stabilizer for delicate fabrics, an iron with iron-on backing or pins for attachment, and a sewing machine if you want to explore machine embroidery patches.
How do I plan and design a patch for DIY Embroidered Patches?
Start with a simple shape or motif and a limited color palette. For beginners patch embroidery, transfer the design onto the fabric using tracing paper or a fabric pen, then keep outlines bold and details large so stitching stays clean.
What are the basic steps in the DIY Embroidered Patches tutorial for beginners?
This beginner-friendly DIY embroidered patches tutorial covers: transfer the design, prepare the fabric (and hoop if desired), outline with a simple stitch like backstitch, fill areas with satin or long-and-short stitches, finish the edges with a neat satin edge, and attach the patch to your garment or bag using iron-on backing or sew-on methods.
Should I start with hand embroidery patches or machine embroidery patches?
For beginners, start with hand embroidery patches to learn texture, tension, and control. As you gain confidence, try machine embroidery patches for faster production and consistent stitching.
How do I care for and attach my DIY Embroidered Patches?
Attach patches with iron-on backing or sew-on, then follow care instructions: wash garments inside out on a gentle cycle, avoid high heat, and air-dry when possible to protect colors and stitching. If you used a heat-activated backing, follow the backing instructions for heat exposure.
| Topic | Key Points |
|---|---|
| DIY Embroidered Patches overview | Popular, creative way to personalize clothing, backpacks, hats, and gear; beginner-friendly entry point to practice stitches and learn about fabrics; step-by-step guide for beginners. |
| Why patches appeal | Versatile, affordable, and highly customizable; can be sewn or ironed on; suitable for beginners and experienced stitchers; builds basic embroidery skills. |
| Essential supplies | Backing fabric (felt or denim), embroidery hoop (optional), embroidery needle, embroidery floss, scissors/markers, stabilizer, iron and backing or pins, sewing machine optional. |
| Design planning | Start with simple shapes or motifs; limit color palette; choose designs that translate well to embroidery (geometric shapes, monograms, simple animals/flowers); transfer with lightbox/marker; bold outlines help beginners. |
| Beginner step-by-step | 1) Transfer design; 2) Prepare fabric/hoop; 3) Start with a simple stitch (backstitch or running stitch); 4) Fill with satin/long-and-short stitches; 5) Finish edges/backing; 6) Attach and care for the patch. |
| Techniques: hand vs machine | Hand embroidery patches emphasize texture with stitches like backstitch and satin; machine embroidery patches offer speed and uniformity. Beginners can start with hand embroidery, then explore machine embroidery as skills grow. |
| Common mistakes | Tension issues, lack of stabilizer, and fraying edges. Prevent with a hoop or stabilizer, practice even stitch length, finish edges with satin stitch, and test iron-on backing on scrap fabric. |
| Creative ideas & applications | Letters for monograms, animals for kids’ clothing, or abstract shapes for a modern look. Ideal on denim jackets, canvas totes, backpacks, hats; create a cohesive patch series with a limited palette. |
| Care & maintenance | Turn garments inside out before washing; use mild detergent; avoid high heat; follow backing care instructions; for machine patches, use a gentler cycle and air-dry when possible to preserve colors and stitching. |
Summary
DIY Embroidered Patches offer a creative, accessible route to personalizing clothing and gear while learning essential embroidery skills. Starting with a simple design and the right supplies, you can gradually build confidence through hand or machine embroidery patches, expanding from basic stitches to more intricate motifs. Whether you’re patching a jacket, backpack, or hat, this craft invites experimentation, texture, and color while staying approachable for beginners. With patience and practice, your patches will tell your story one stitch at a time, turning everyday items into unique wearable art.